Building a high-performance poultry facility is a critical investment for any agricultural operation. When structures are poorly planned, they lead to increased maintenance costs, poor animal health, and a significant decrease in operational efficiency. These structural inadequacies not only compromise animal welfare but also directly impact the long-term ROI of your project. By following professional engineering standards and utilizing durable materials, you can learn how to build a chicken house that stands the test of time and environmental stressors.
What are the key planning steps for a chicken house?
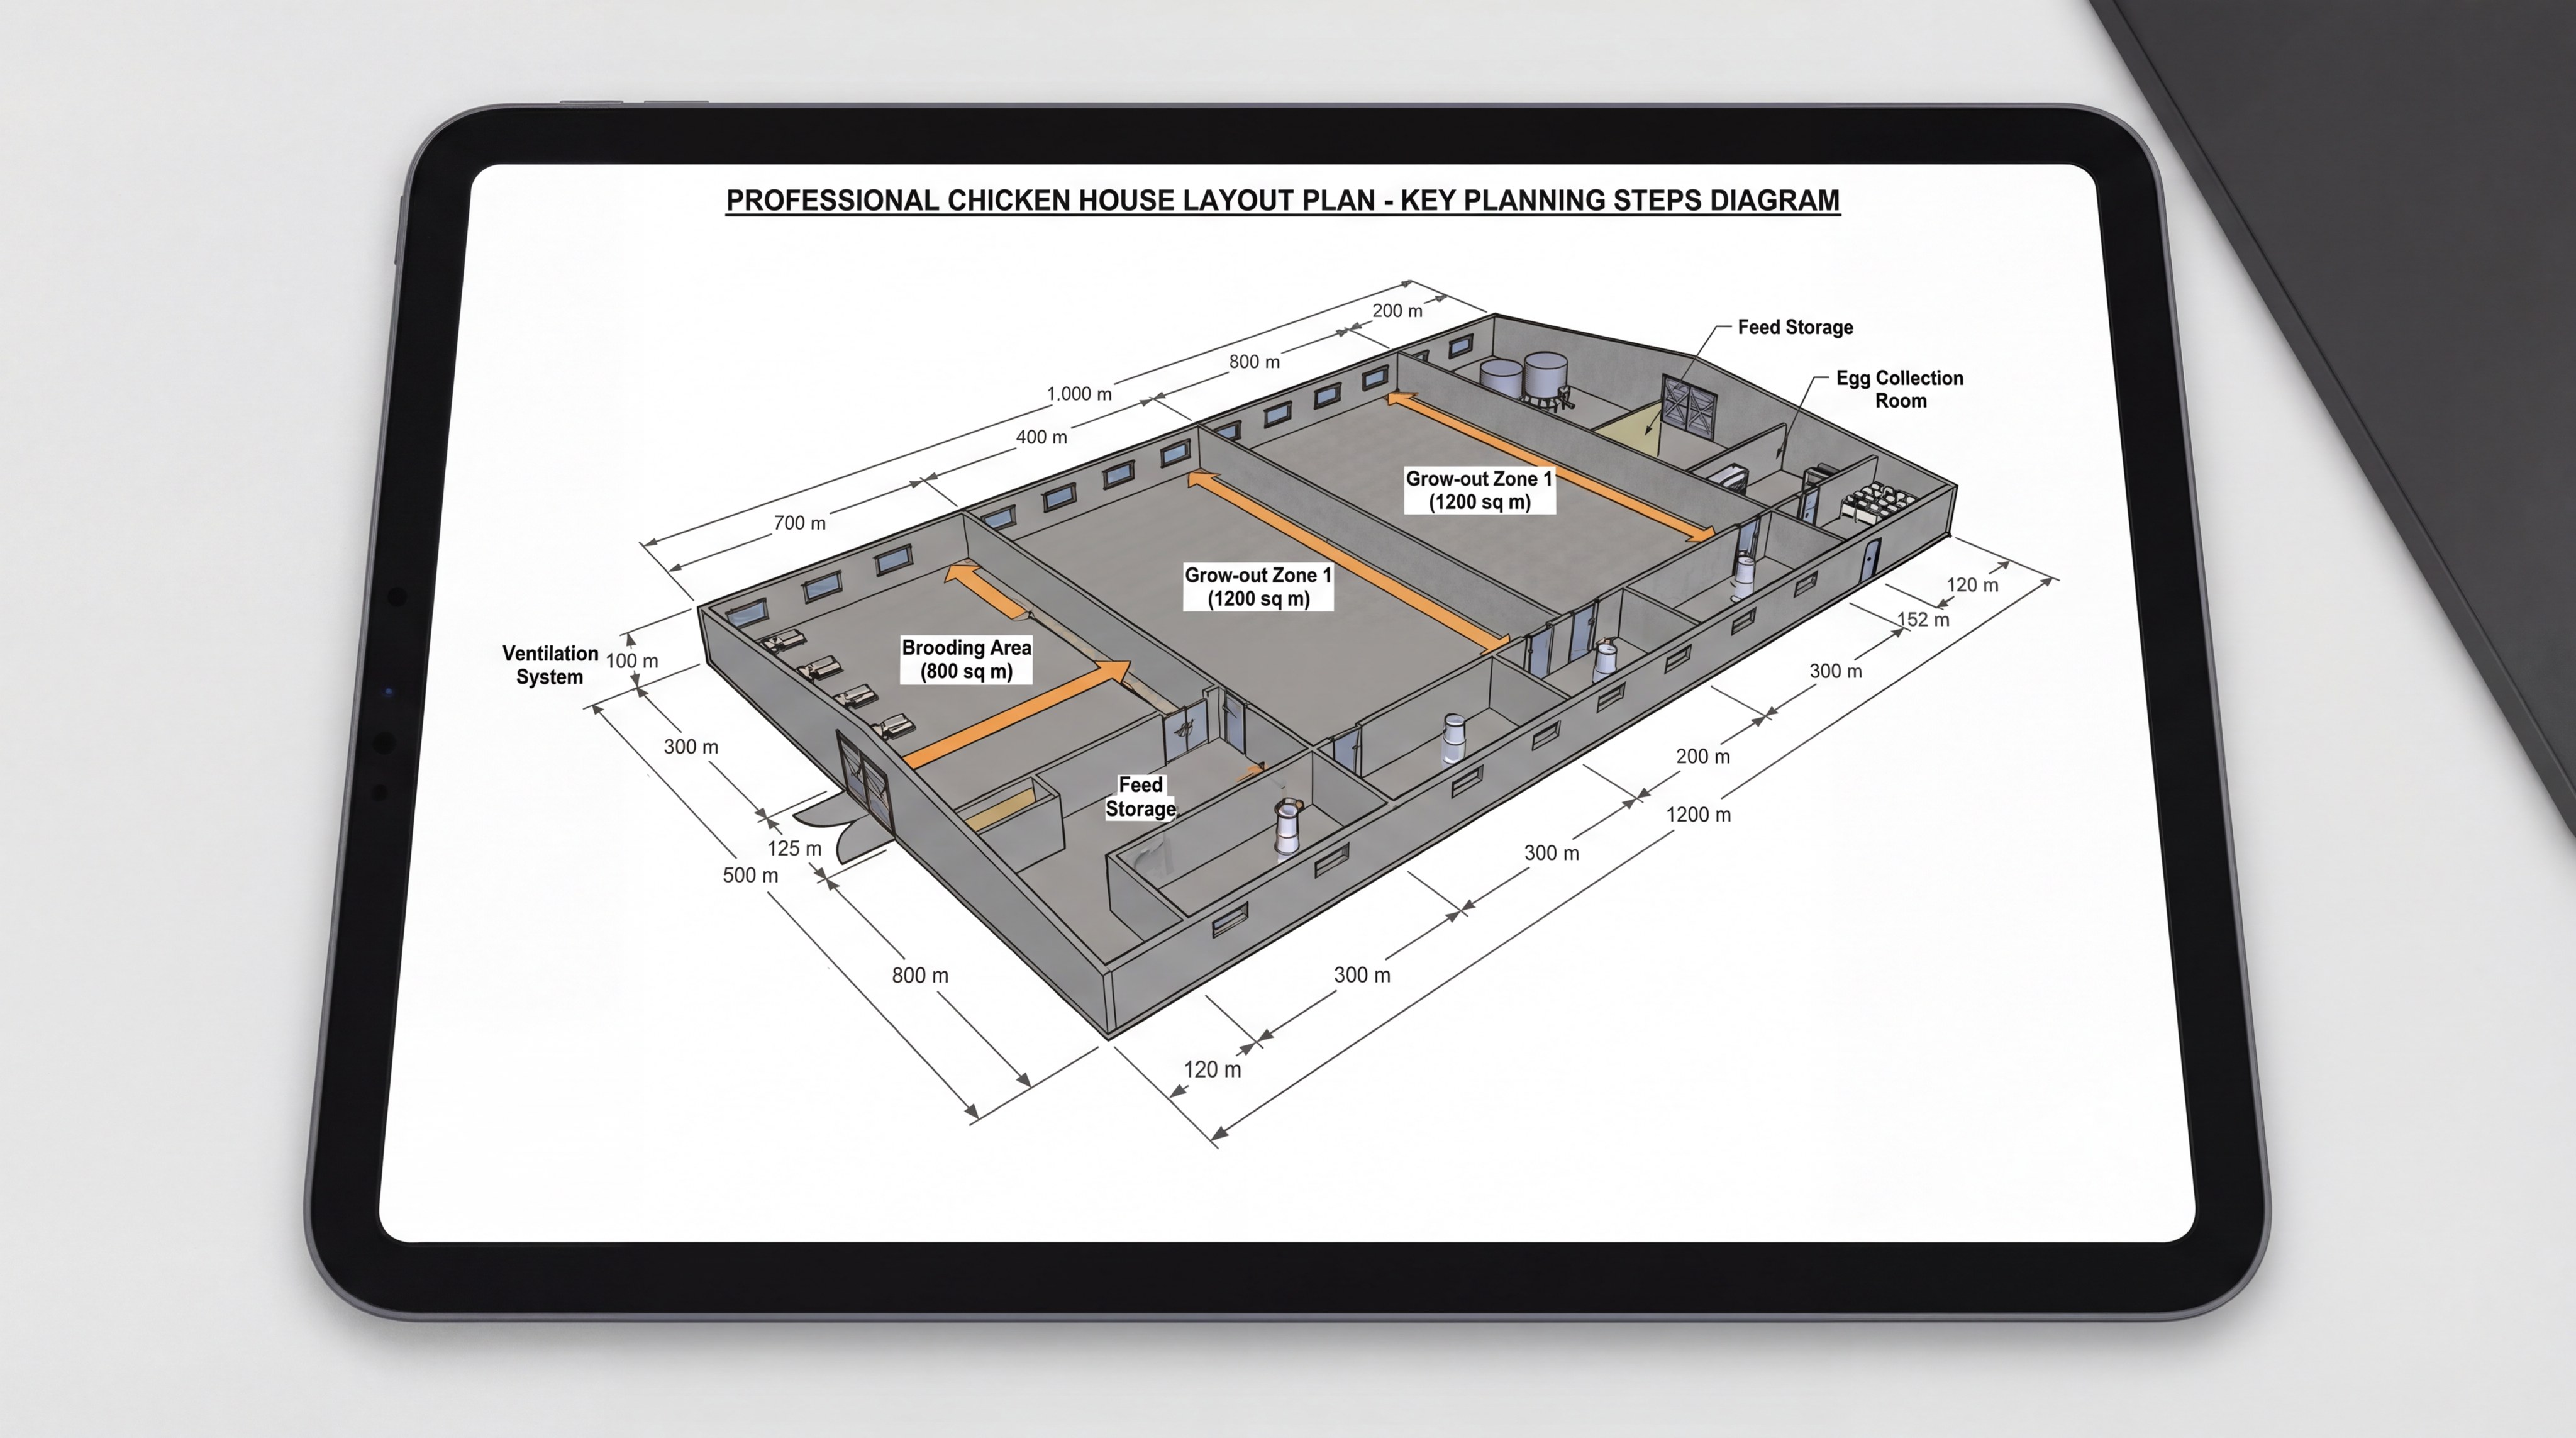
Successful construction begins with a comprehensive analysis of flock capacity, site logistics, and ventilation requirements to ensure a productive environment. When considering how to build a chicken house , you must prioritize the spatial needs of your specific breed to prevent overcrowding.
Think about it: If your layout is flawed from day one, no amount of high-end materials can fix the resulting operational inefficiencies.
Determining Operational Scale and Capacity
Calculating the required square footage per bird is the first step in planning, typically requiring 3-4 square feet of internal space per chicken. This prevents stress-related behaviors and ensures the longevity of your interior fittings.
Selecting the Optimal Site Location
The site must offer excellent drainage and easy access for utility connections while maintaining sufficient distance from other agricultural structures. A well-drained site prevents the foundation from sinking and reduces the risk of soil-borne diseases.
Key Takeaway: Thorough planning regarding bird density and site location is the foundation of a successful agricultural building project.
| Planning Element | Specification | Importance | |
|---|---|---|---|
| Space per Bird | 3-4 sq. ft. | Animal Health | |
| Site Orientation | South-facing (typical) | Natural Light | |
| Drainage | Slope away from coop | Foundation Integrity |
Precise spatial planning ensures that the structure remains functional as the flock grows or as operational needs shift.
How do you construct a solid chicken house foundation?
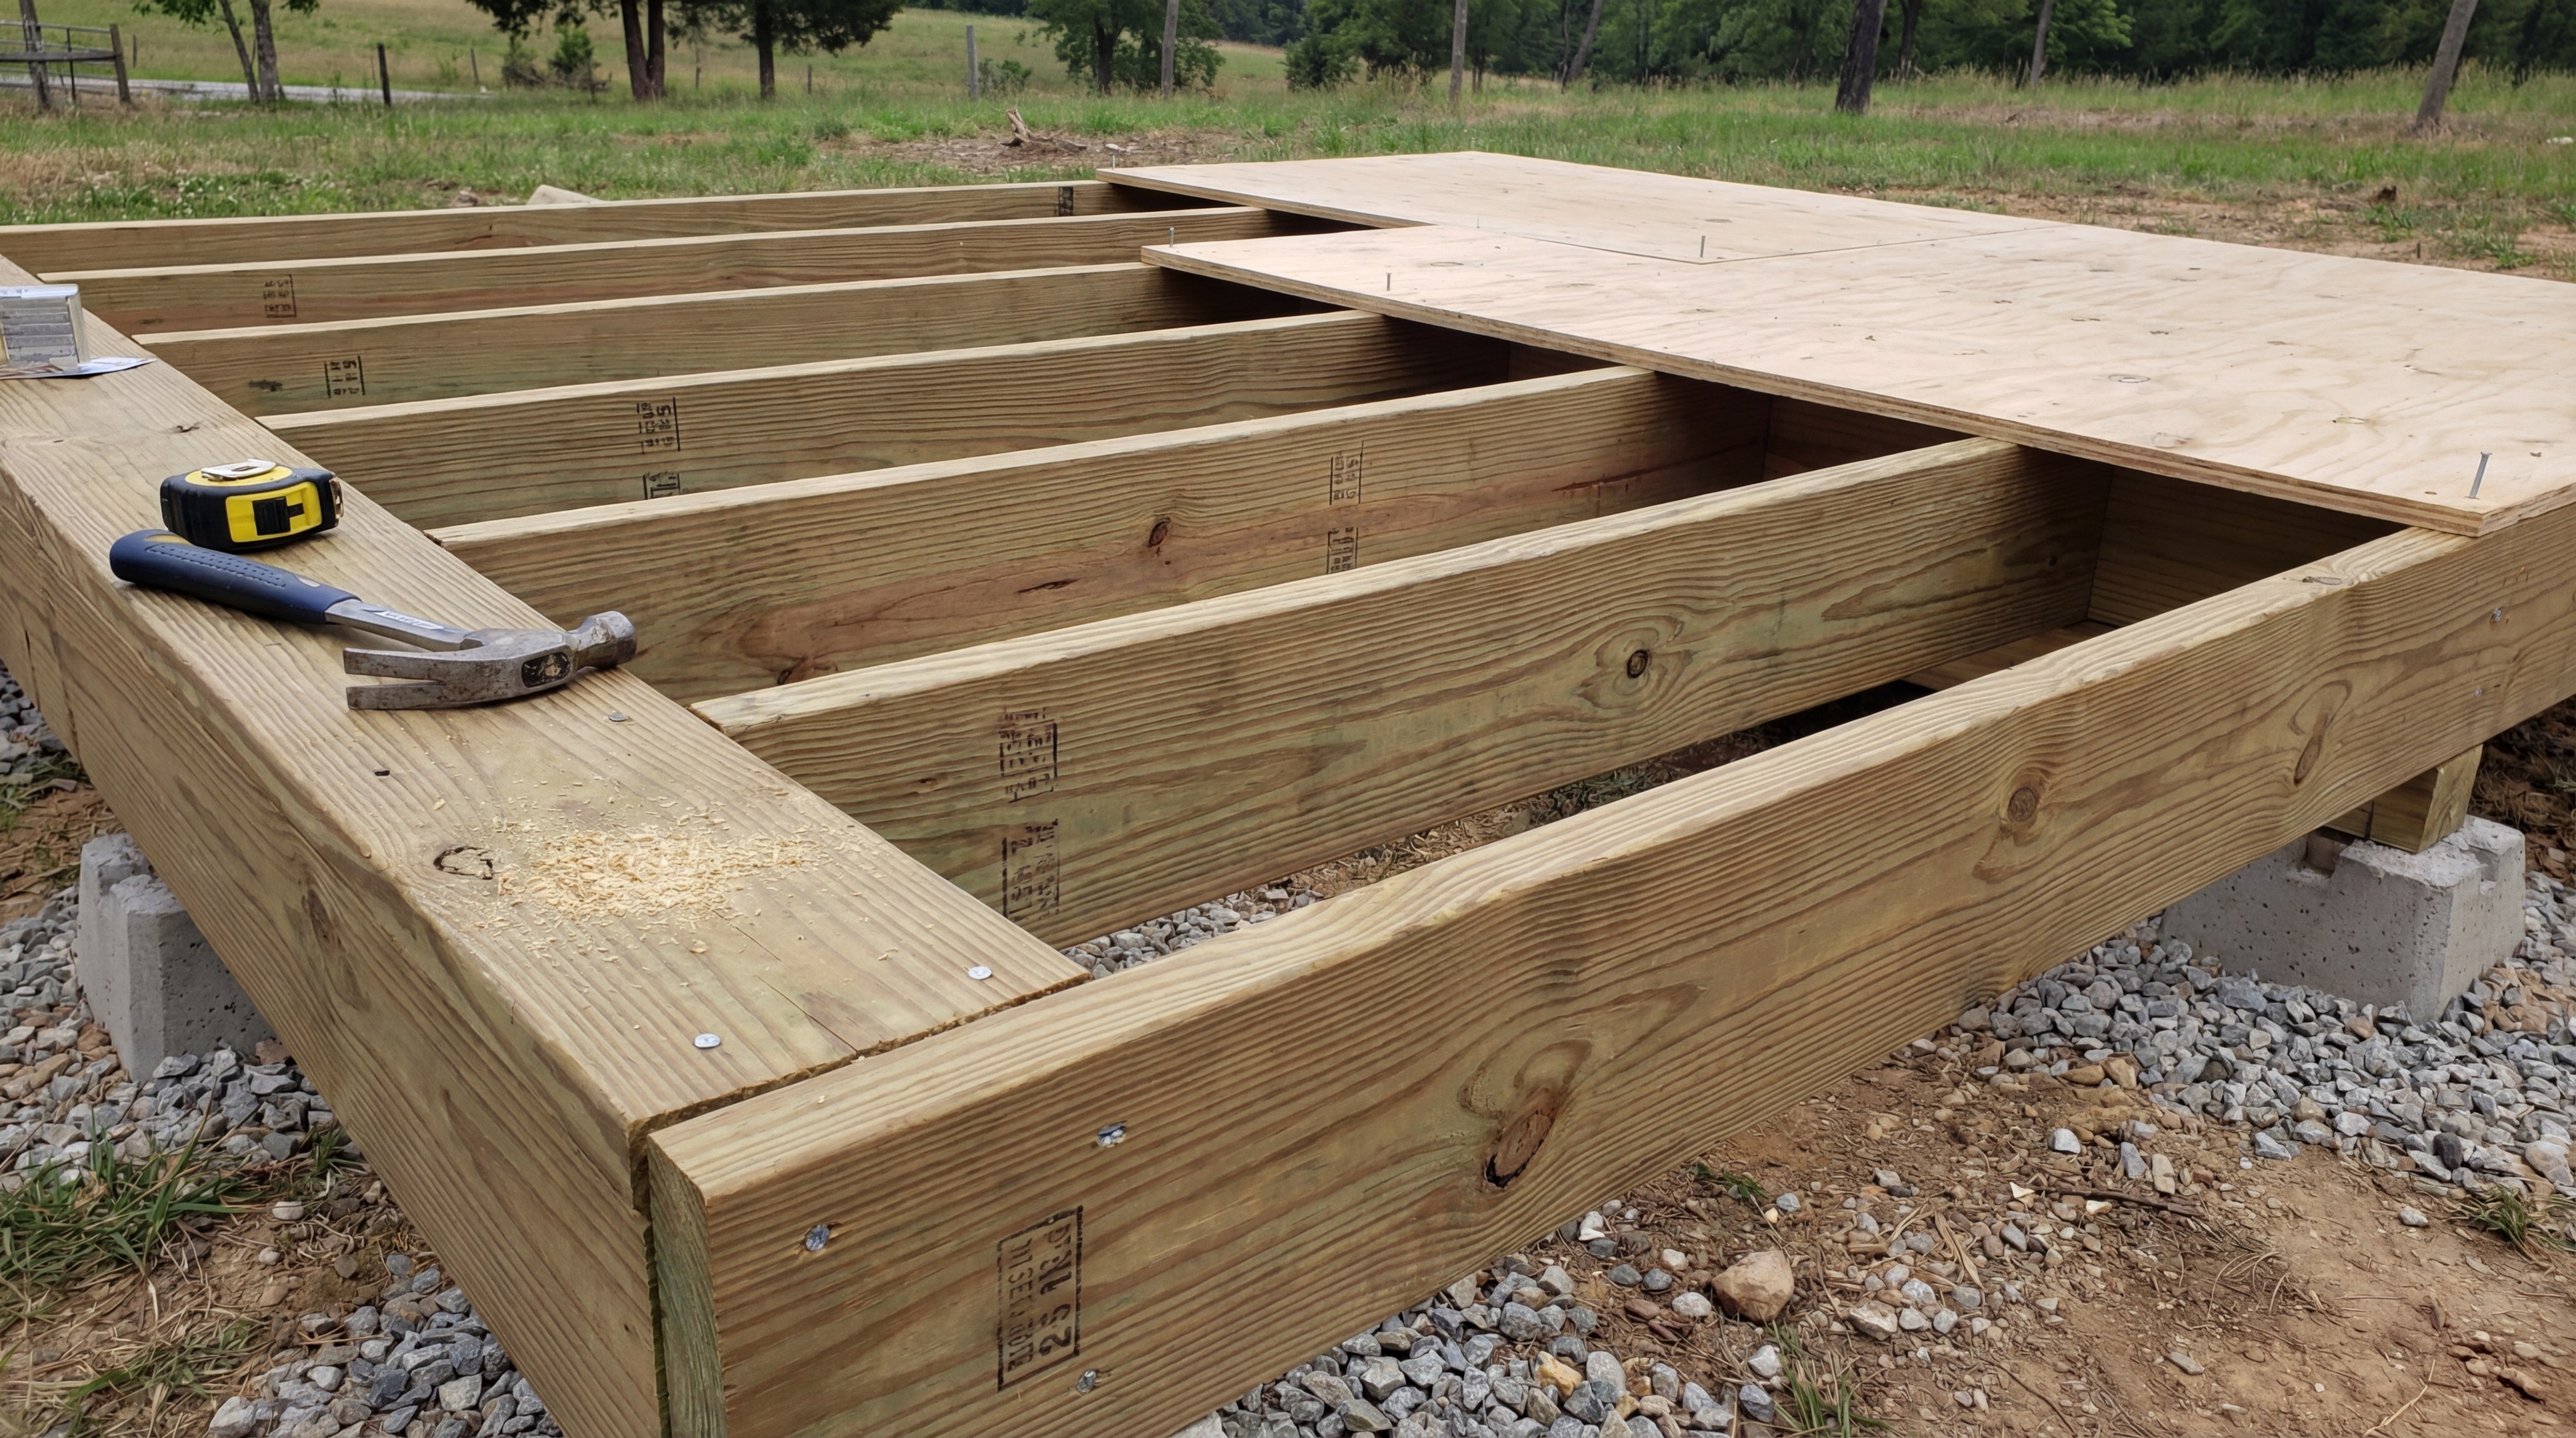
A durable foundation relies on a pressure-treated timber frame and moisture-resistant subflooring to provide a stable, level base for the vertical structure. Even when researching how to build a chicken house, builders often overlook the long-term impact of ground moisture on wood.
Look no further: The foundation is the most critical component for preventing structural rot over a ten-year horizon.
Framing the Inner Foundation
Using 2×4 pressure-treated joists secured with ring shank nails ensures the floor frame can support the weight of the birds and bedding. You can view our full range of agricultural products to see how these frames integrate with larger steel systems.
- Use pressure-treated lumber for all ground-contact components.
- Space joists at 16 inches on-center for maximum rigidity.
- Ensure the frame is perfectly level before attaching sheathing.
Installing the Subfloor Sheathing
Applying 7/16″ plywood or high-density sheathing over the joists creates a flat, cleanable surface. This serves as the primary barrier against ground-dwelling pests and moisture.
Key Takeaway: Utilizing pressure-treated materials for the foundation is non-negotiable for preventing rot and ensuring structural longevity.
| Component | Material | Benefit | |
|---|---|---|---|
| Joists | 2×4 Pressure Treated | Moisture Resistance | |
| Subfloor | 7/16″ Sheathing | Cleaning Ease | |
| Spacing | 16″ On-Center | Load Distribution |
A reinforced foundation prevents the sagging and warping that often plagues lighter, amateur-built poultry structures.
What is the best way to frame chicken house walls?
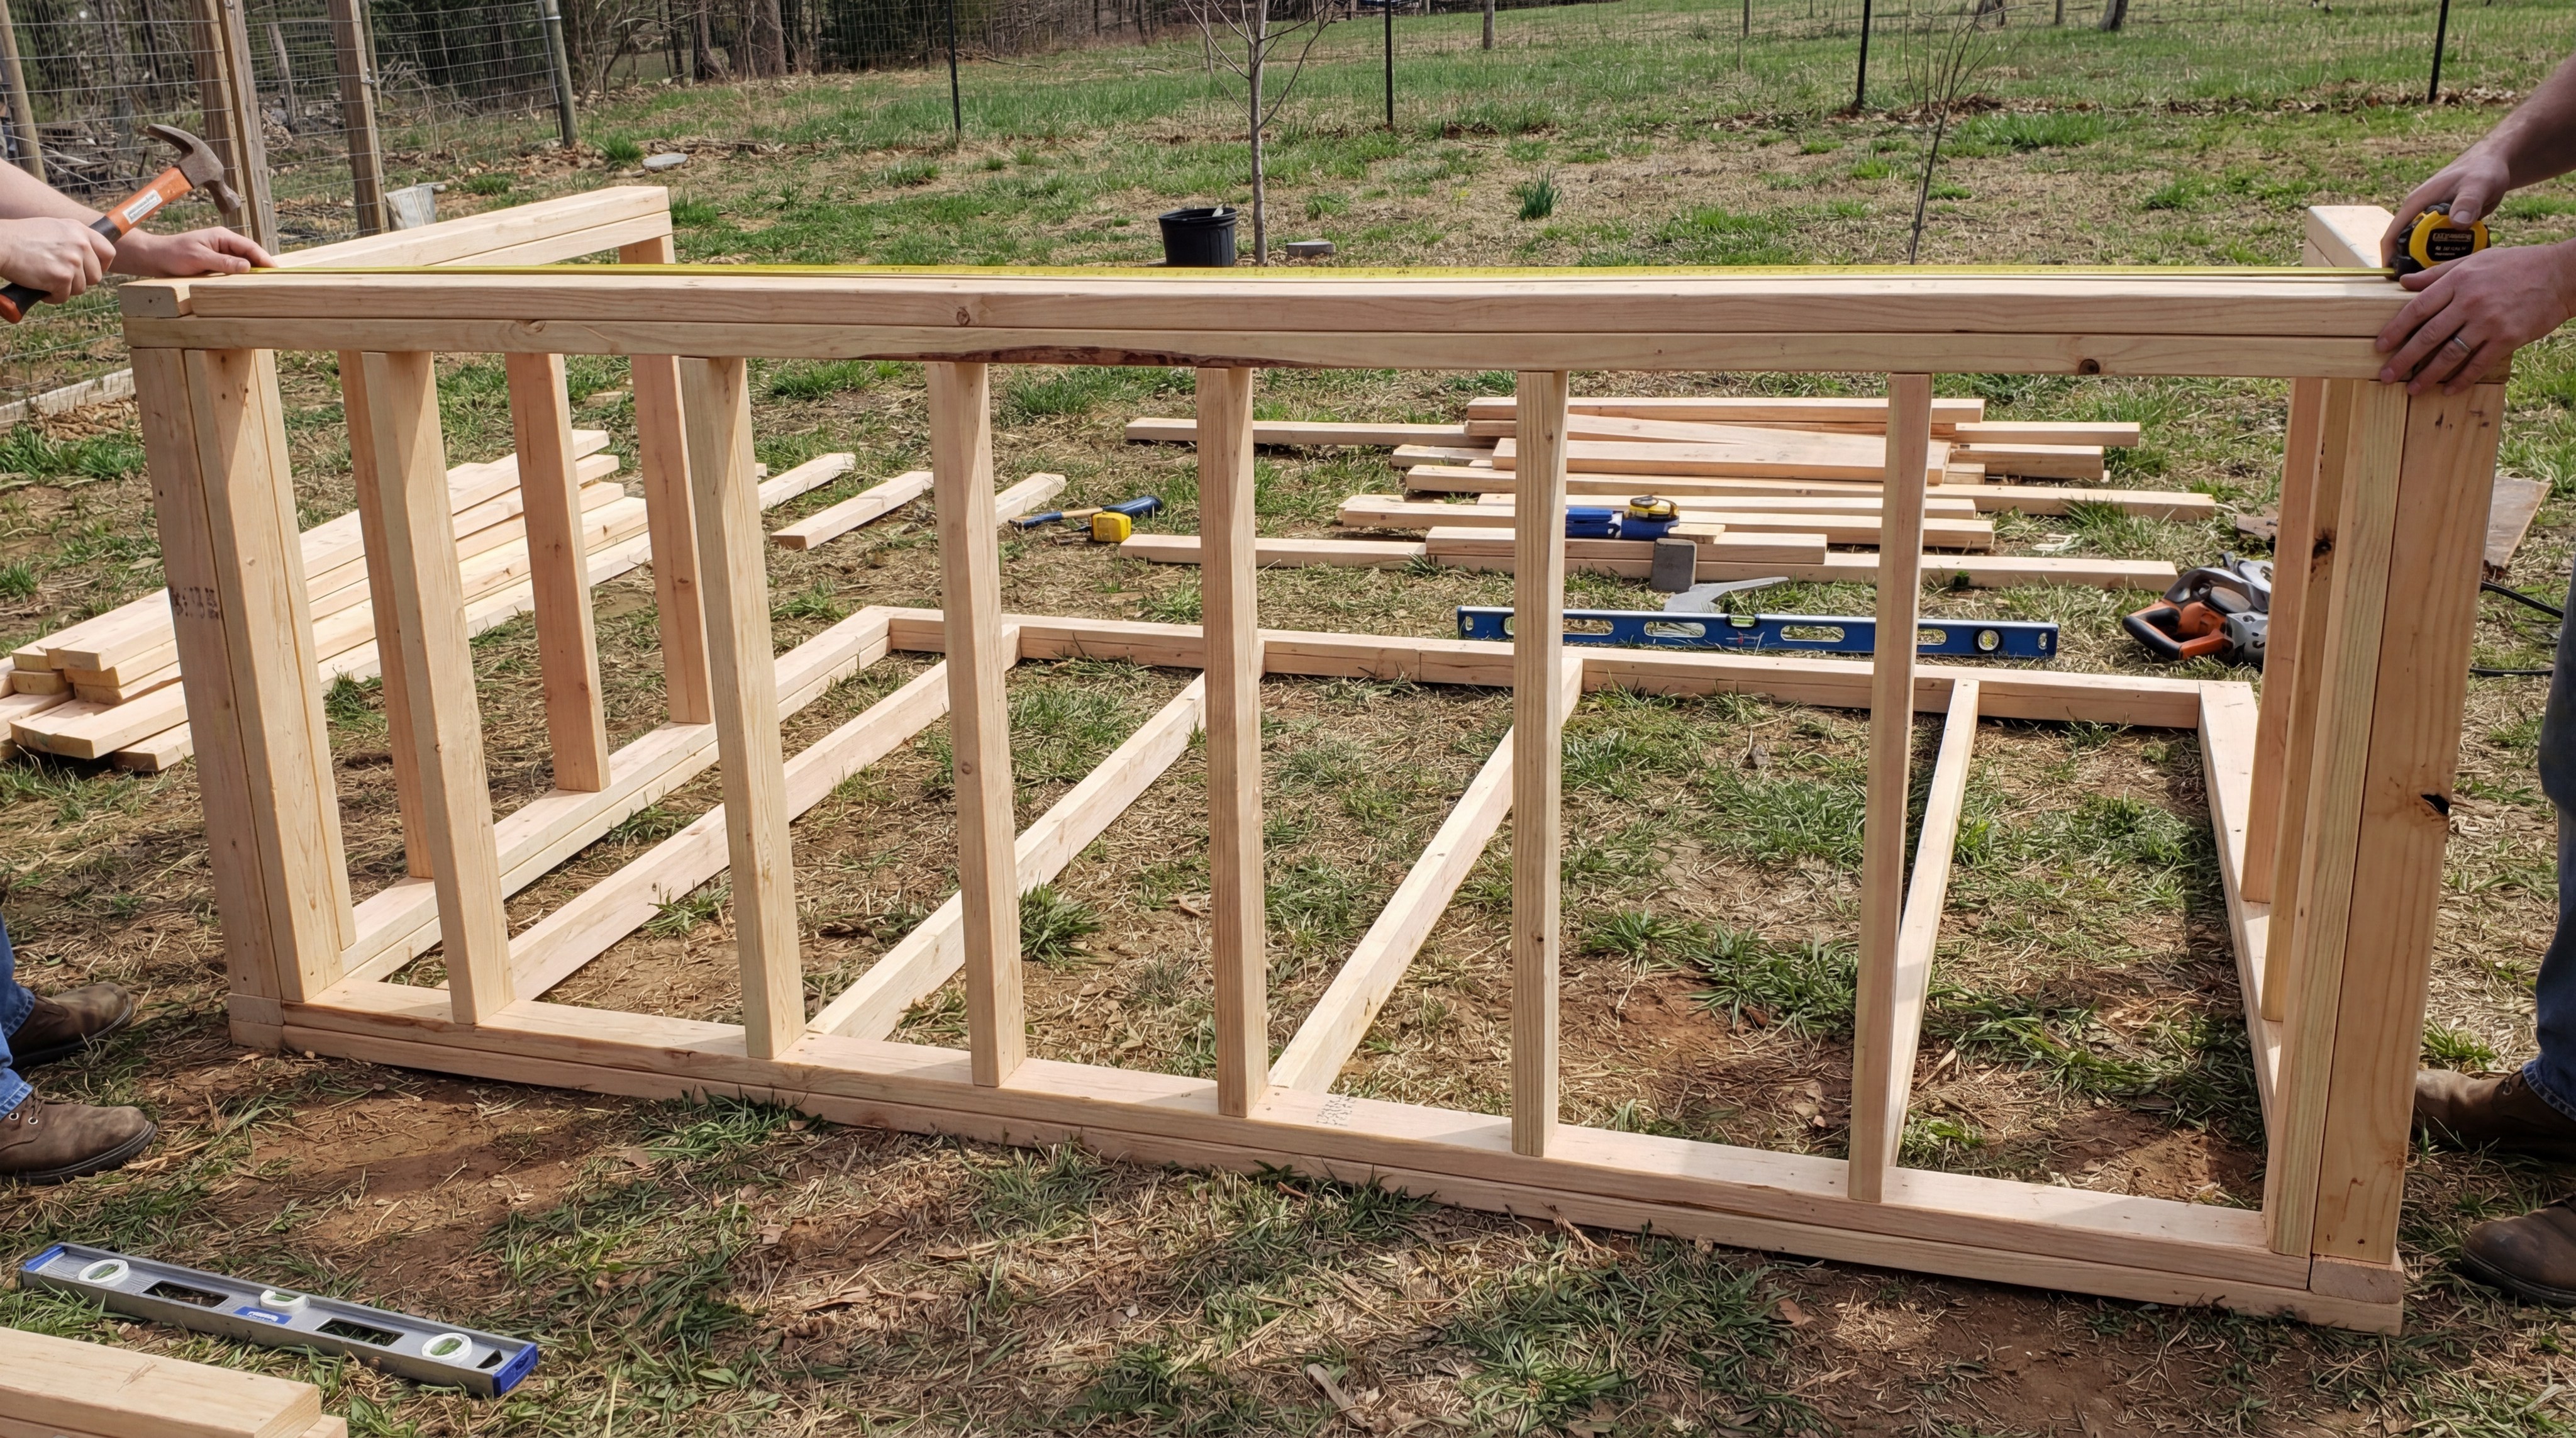
The most effective method for framing walls involves assembling stud panels on a flat surface before hoisting and securing them to the foundation plate. This professional approach to how to build a chicken house ensures that every corner is square and every stud is vertical.
Here is the deal: Assembling panels on the ground is not just easier; it is significantly more accurate for long-term structural alignment.
Standardizing Stud Placement
Standard 16-inch or 24-inch on-center spacing provides the necessary structural support for the roof while allowing for the integration of windows. This is similar to the techniques used in a professional Steel Structure Workshop to ensure load-bearing capacity.
- Mark the top and bottom plates simultaneously for accuracy.
- Use a framing square to verify every joint.
- Install double top plates if you plan on a heavy roofing material.
Ensuring Structural Squareness
Measuring diagonally across the corners of the wall frame before final fastening ensures the structure is perfectly square. This prevents issues during the later stages of sheathing and roofing installation.
Key Takeaway: Assembling wall panels on the ground increases precision and safety during the framing stage of construction.
| Framing Part | Role | Standard Dimension | |
|---|---|---|---|
| Bottom Plate | Anchors to Foundation | 2×4 Lumber | |
| Studs | Vertical Support | Cut to Height | |
| Top Plate | Supports Roof Rafters | 2×4 Lumber |
Properly framed walls provide the rigid skeleton necessary to withstand wind loads and support heavy exterior cladding.
How do you install functional roosting rails?
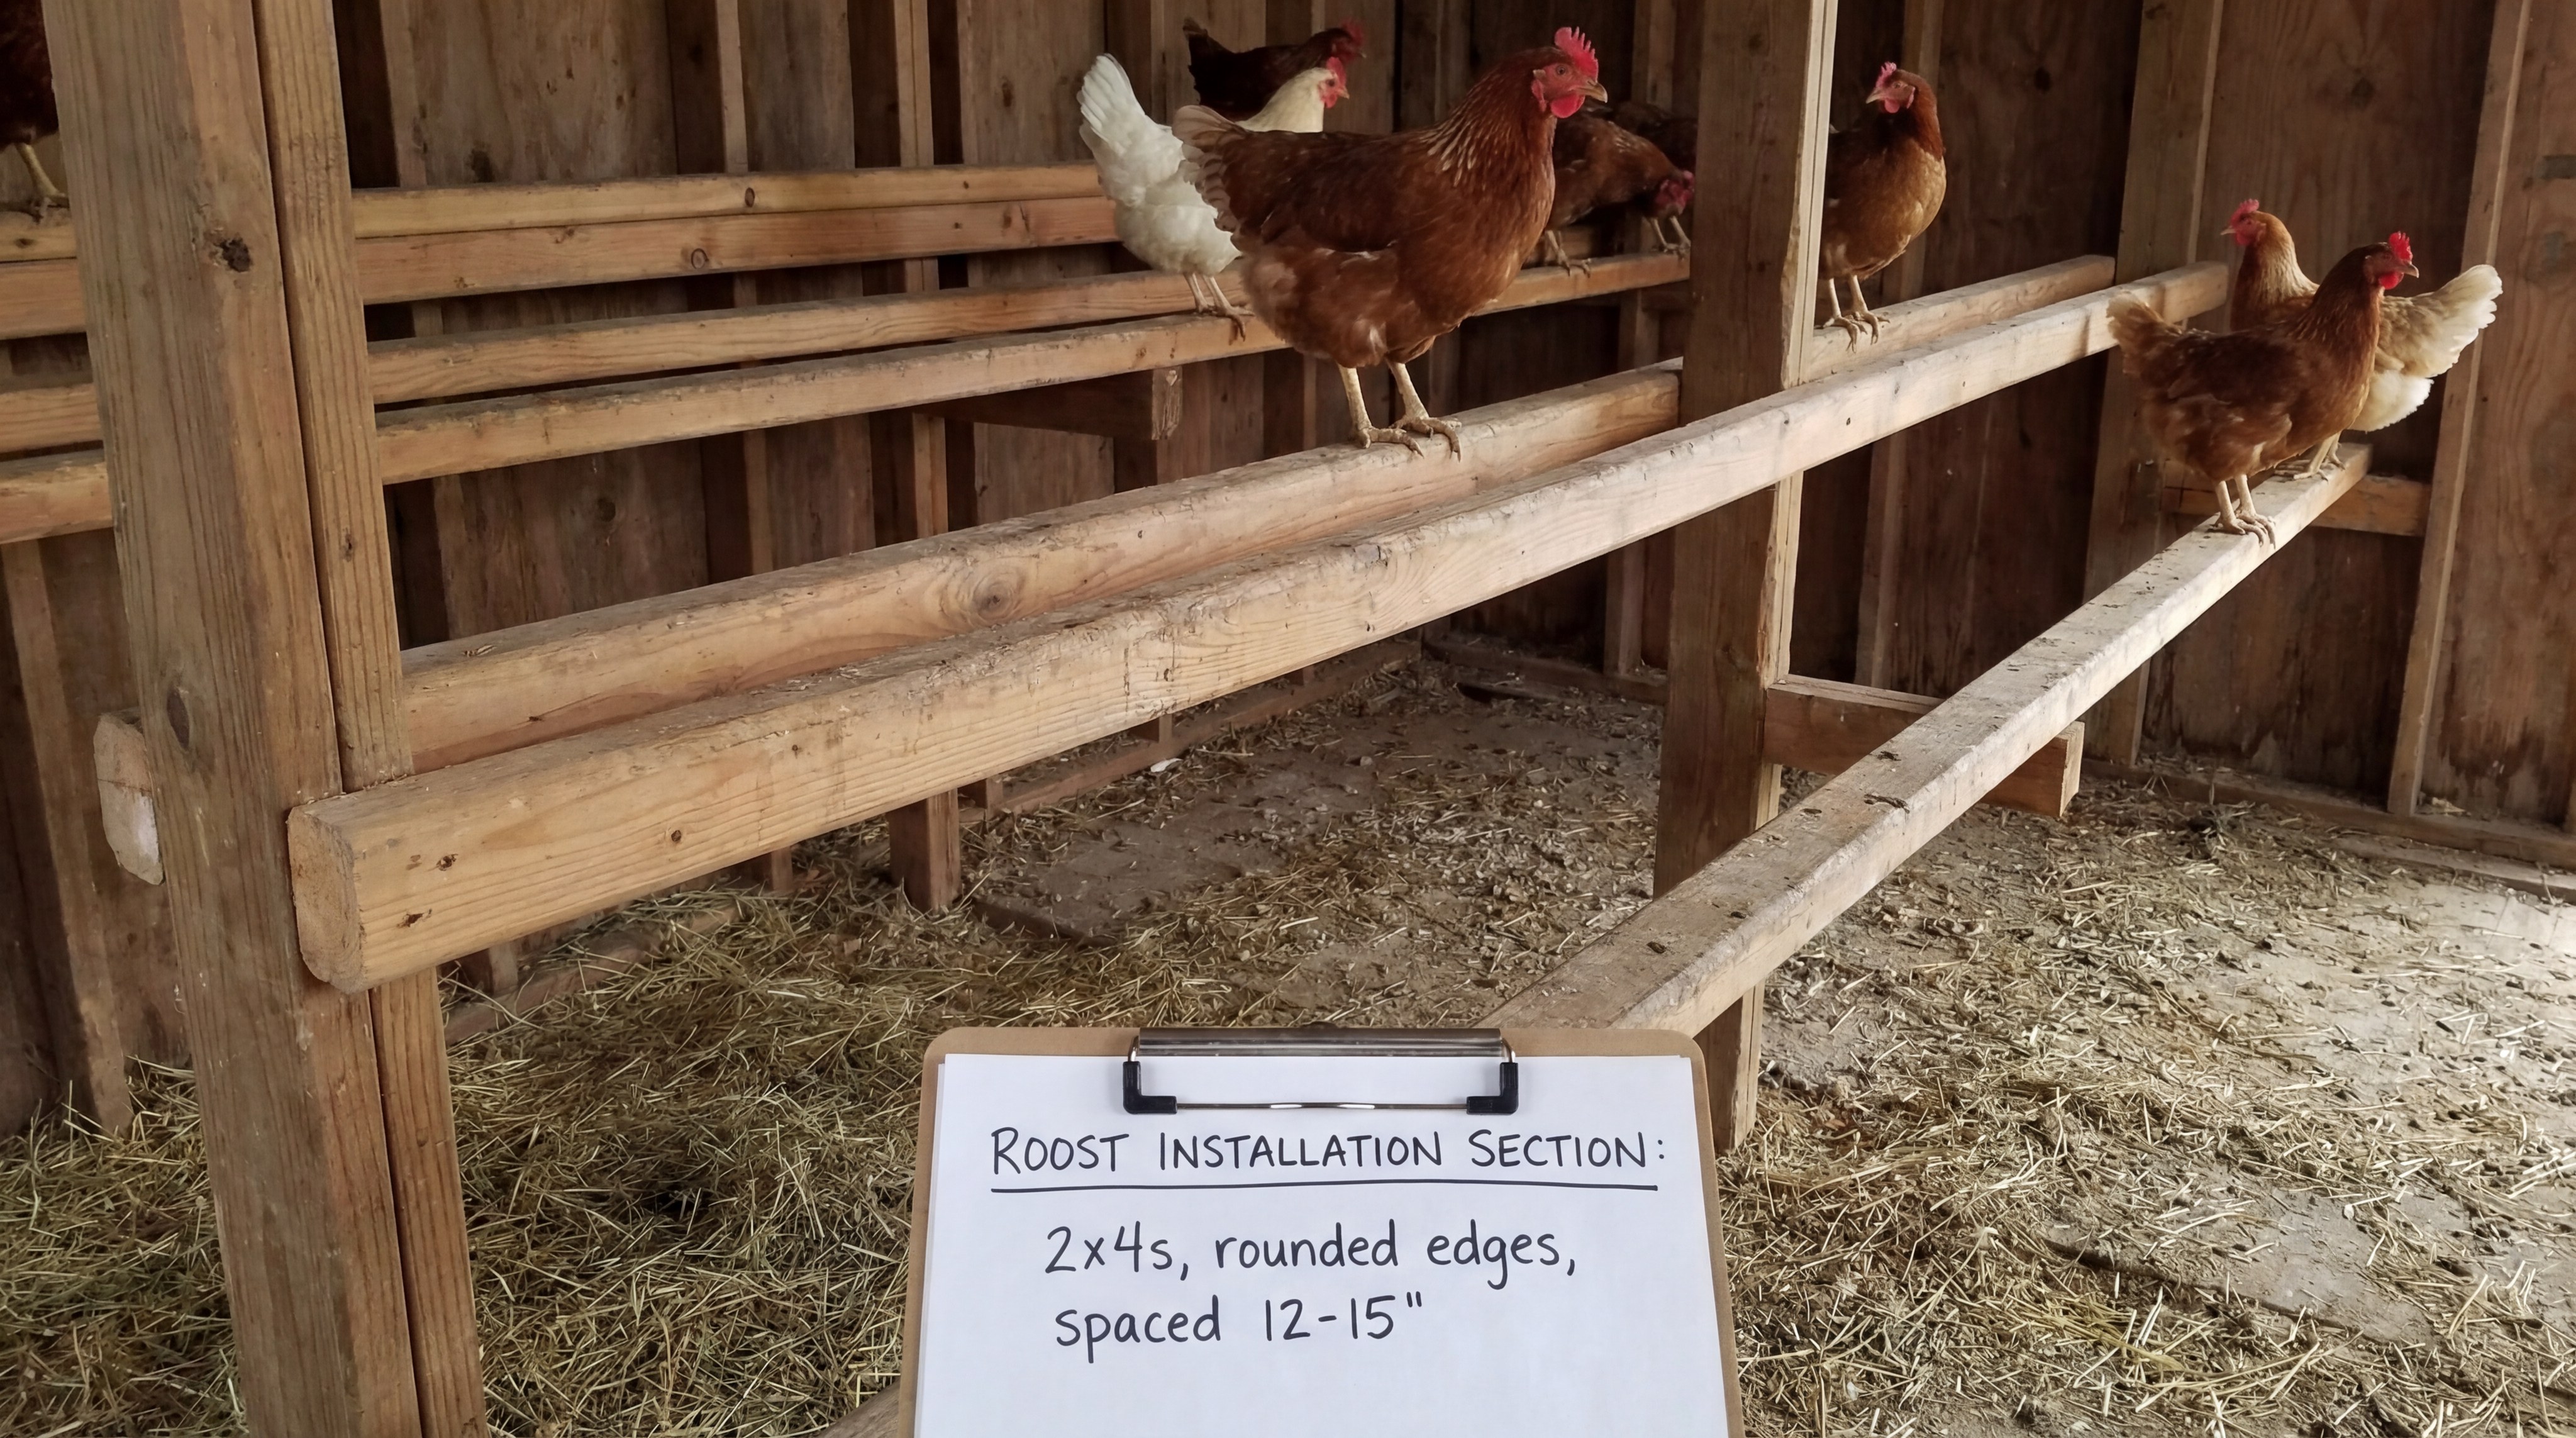
Functional roosting rails must be positioned at graduated heights and securely anchored to the wall studs to provide a safe nocturnal environment. When determining how to build a chicken house, the interior comfort of the birds is just as important as the exterior shell.
Simply put: Chickens have a natural instinct to roost high, so your design must accommodate this behavior to reduce flock stress.
Selecting Rail Materials and Dimensions
Using 2×4 lumber with rounded edges prevents foot injuries and provides a comfortable grip for birds of various sizes. This attention to detail differentiates a commercial-grade facility from a basic shed.
- Round off all sharp corners with a sander or router.
- Mount rails at least 18 inches away from the wall to prevent tail feathers from rubbing.
- Ensure the highest rail is at least 12 inches below the ceiling for headroom.
Positioning for Optimal Space
Rails should be spaced at least 12 inches apart horizontally to maximize the number of birds that can roost simultaneously. This prevents competition and “bullying” within the flock hierarchy.
Key Takeaway: Properly spaced roosting rails reduce flock stress and help maintain a cleaner floor environment by concentrating waste.
| Roosting Feature | Requirement | Benefit | |
|---|---|---|---|
| Horizontal Gap | 12″ Minimum | Prevents Crowding | |
| Surface Texture | Smooth/Rounded | Foot Health | |
| Mounting Height | Above Floor Level | Predator Protection |
Intelligently placed roosting bars simplify daily cleaning by localizing the majority of the night’s waste in one area.
What materials are best for sheathing the exterior?
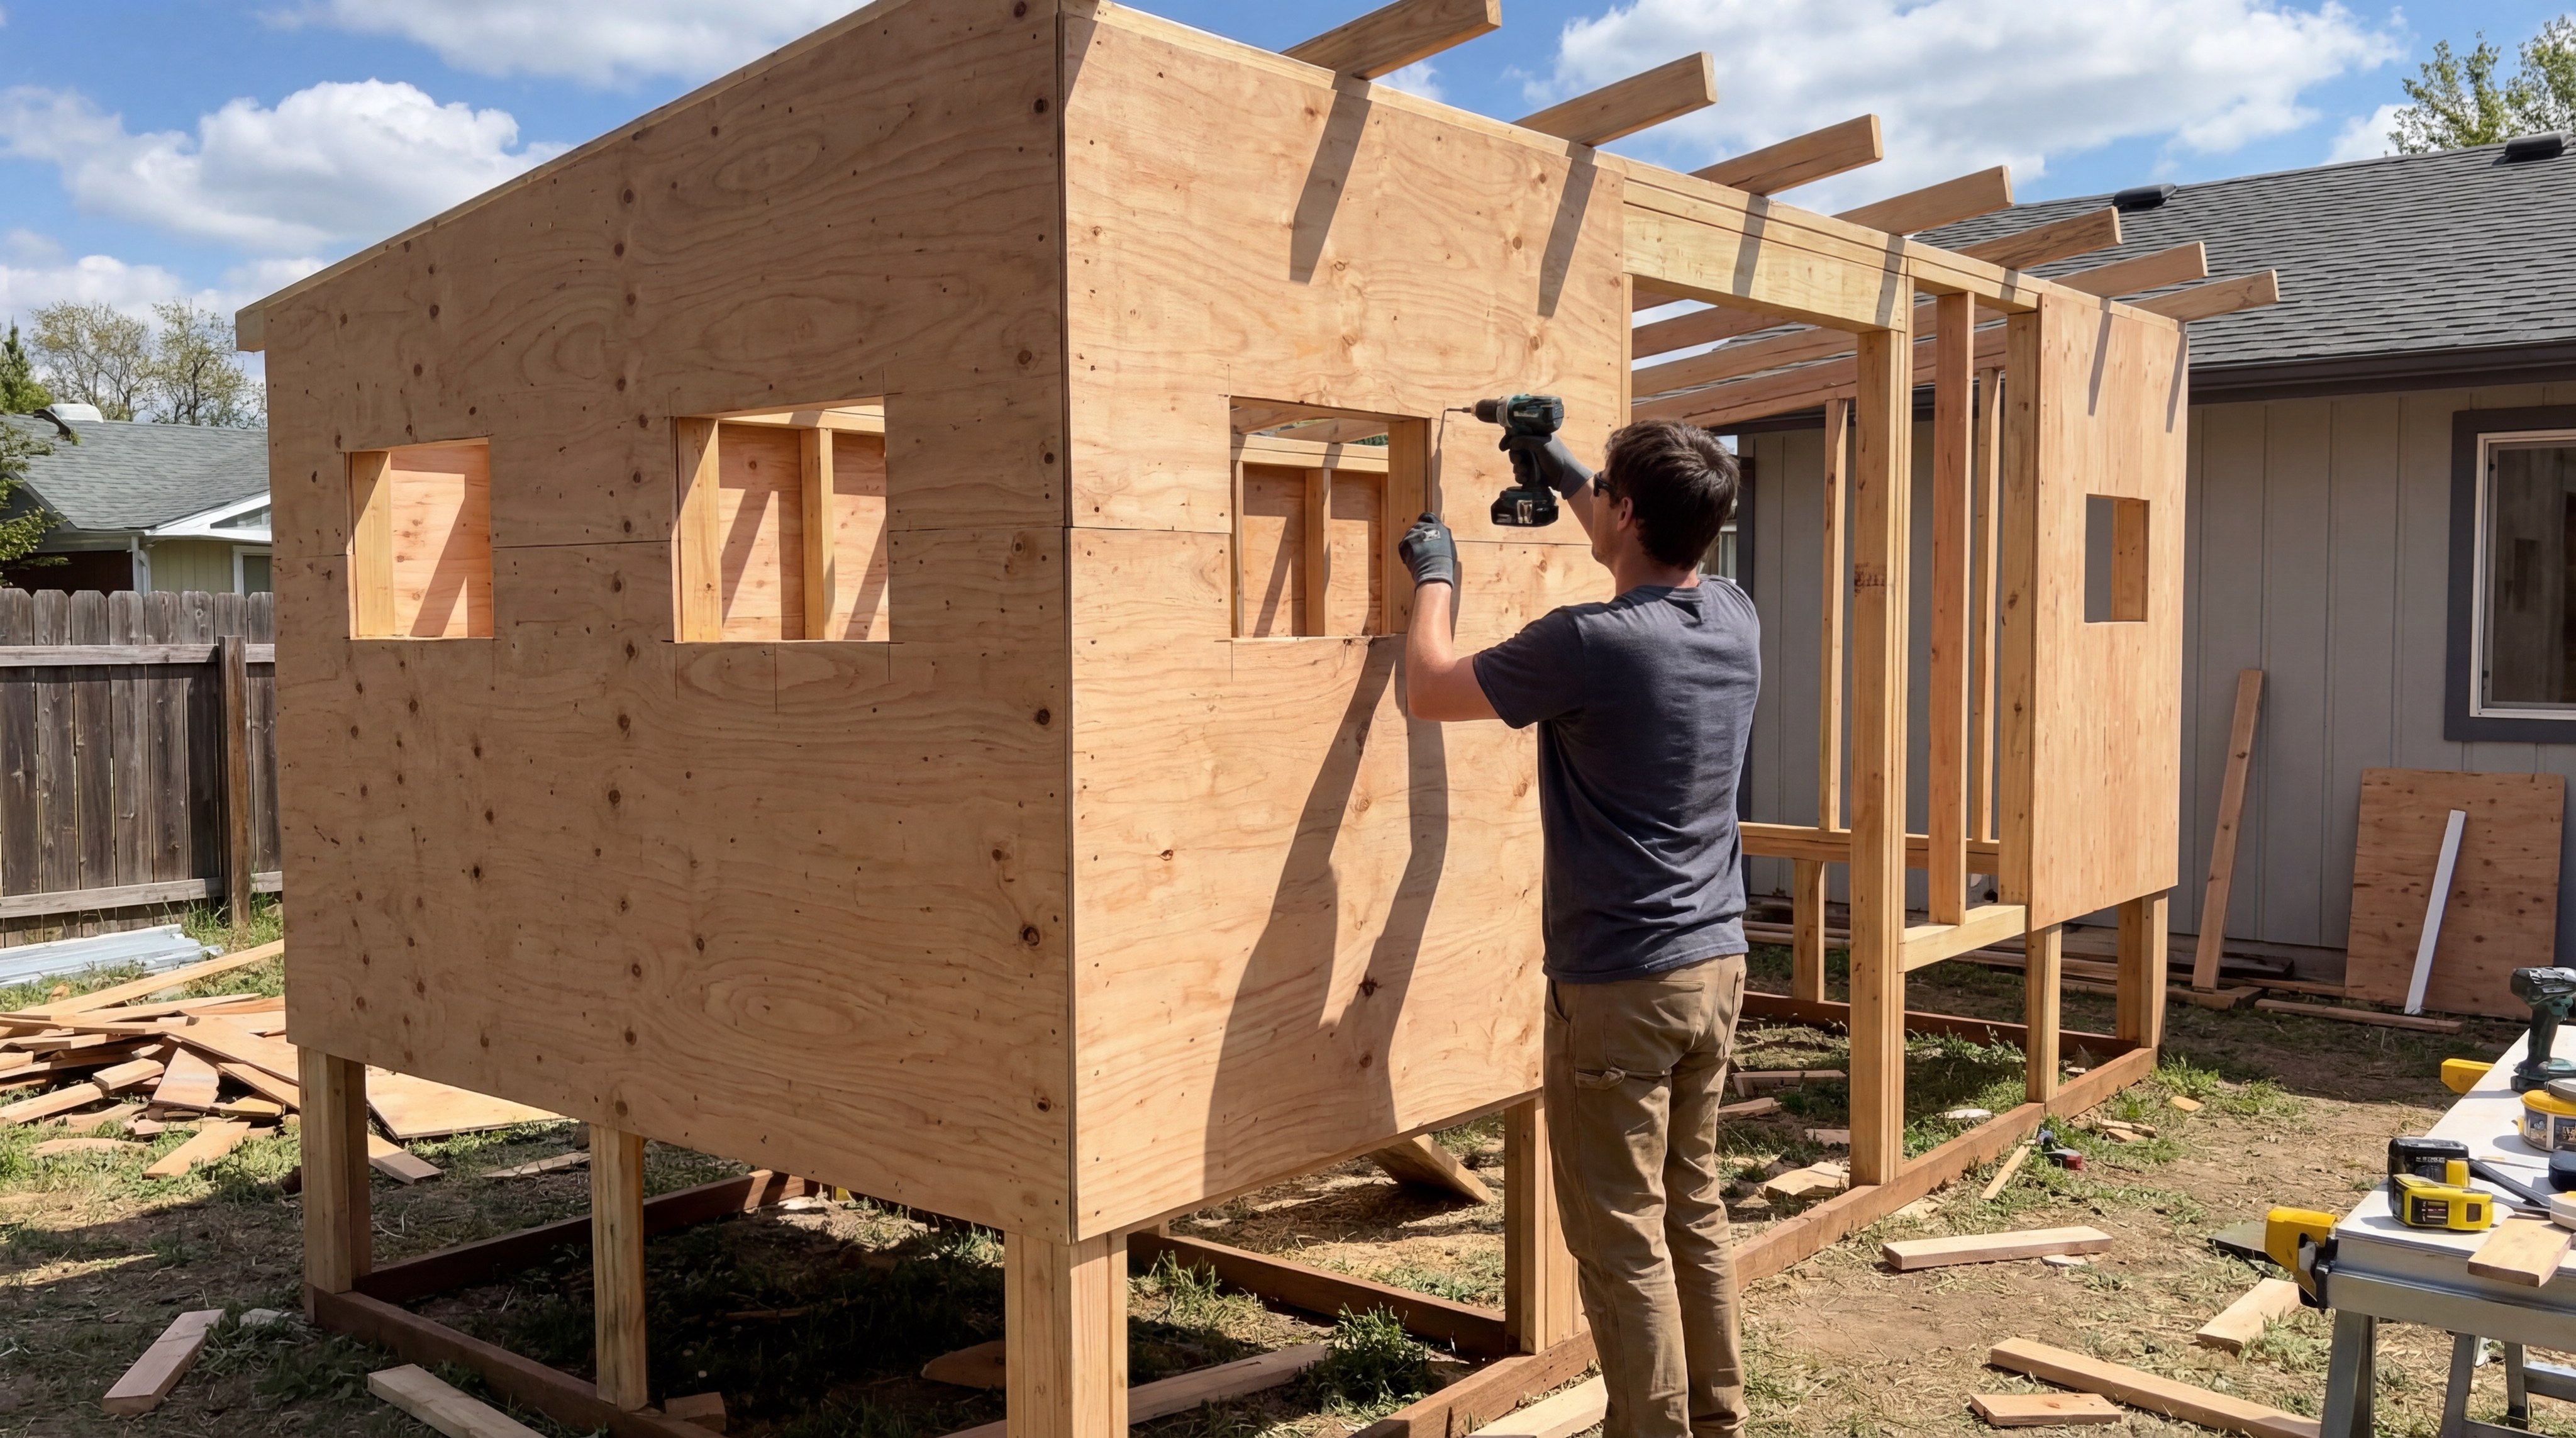
High-grade plywood or specialized OSB sheathing offers the best balance of structural rigidity and weather resistance for agricultural exteriors. If you are researching how to build a chicken house , you will find that sheathing also acts as a “shear wall” to prevent the building from leaning.
The bottom line? Choosing the right thickness of sheathing determines how well the building retains heat during the winter months.
Cutting Precision Openings
Before final installation, precisely measure and cut openings for the nesting boxes, entry doors, and ventilation windows. You can see examples of completed projects in our case studies to understand how professional sheathing should look.
- Use a circular saw for long straight cuts.
- Use a jigsaw for rounded or intricate openings.
- Leave a 1/8-inch gap between panels to allow for natural wood expansion.
Securing the Sheathing Panels
Panels must be fastened to every stud and plate with 2-inch nails to create a unified structural skin. This increases the building’s resistance to predators trying to pry their way inside.
Key Takeaway: Accurate cutting of wall openings is essential for maintaining the building’s thermal envelope and security.
| Sheathing Type | Thickness | Recommended Use | |
|---|---|---|---|
| Exterior Plywood | 7/16″ | Standard Walls | |
| T1-11 Siding | 5/8″ | Aesthetic Finish | |
| Hardware Cloth | 1/2″ Mesh | Ventilation Areas |
A well-sheathed coop is the first line of defense against driving rain and persistent predators like raccoons or foxes.
How do you build an efficient nesting box system?
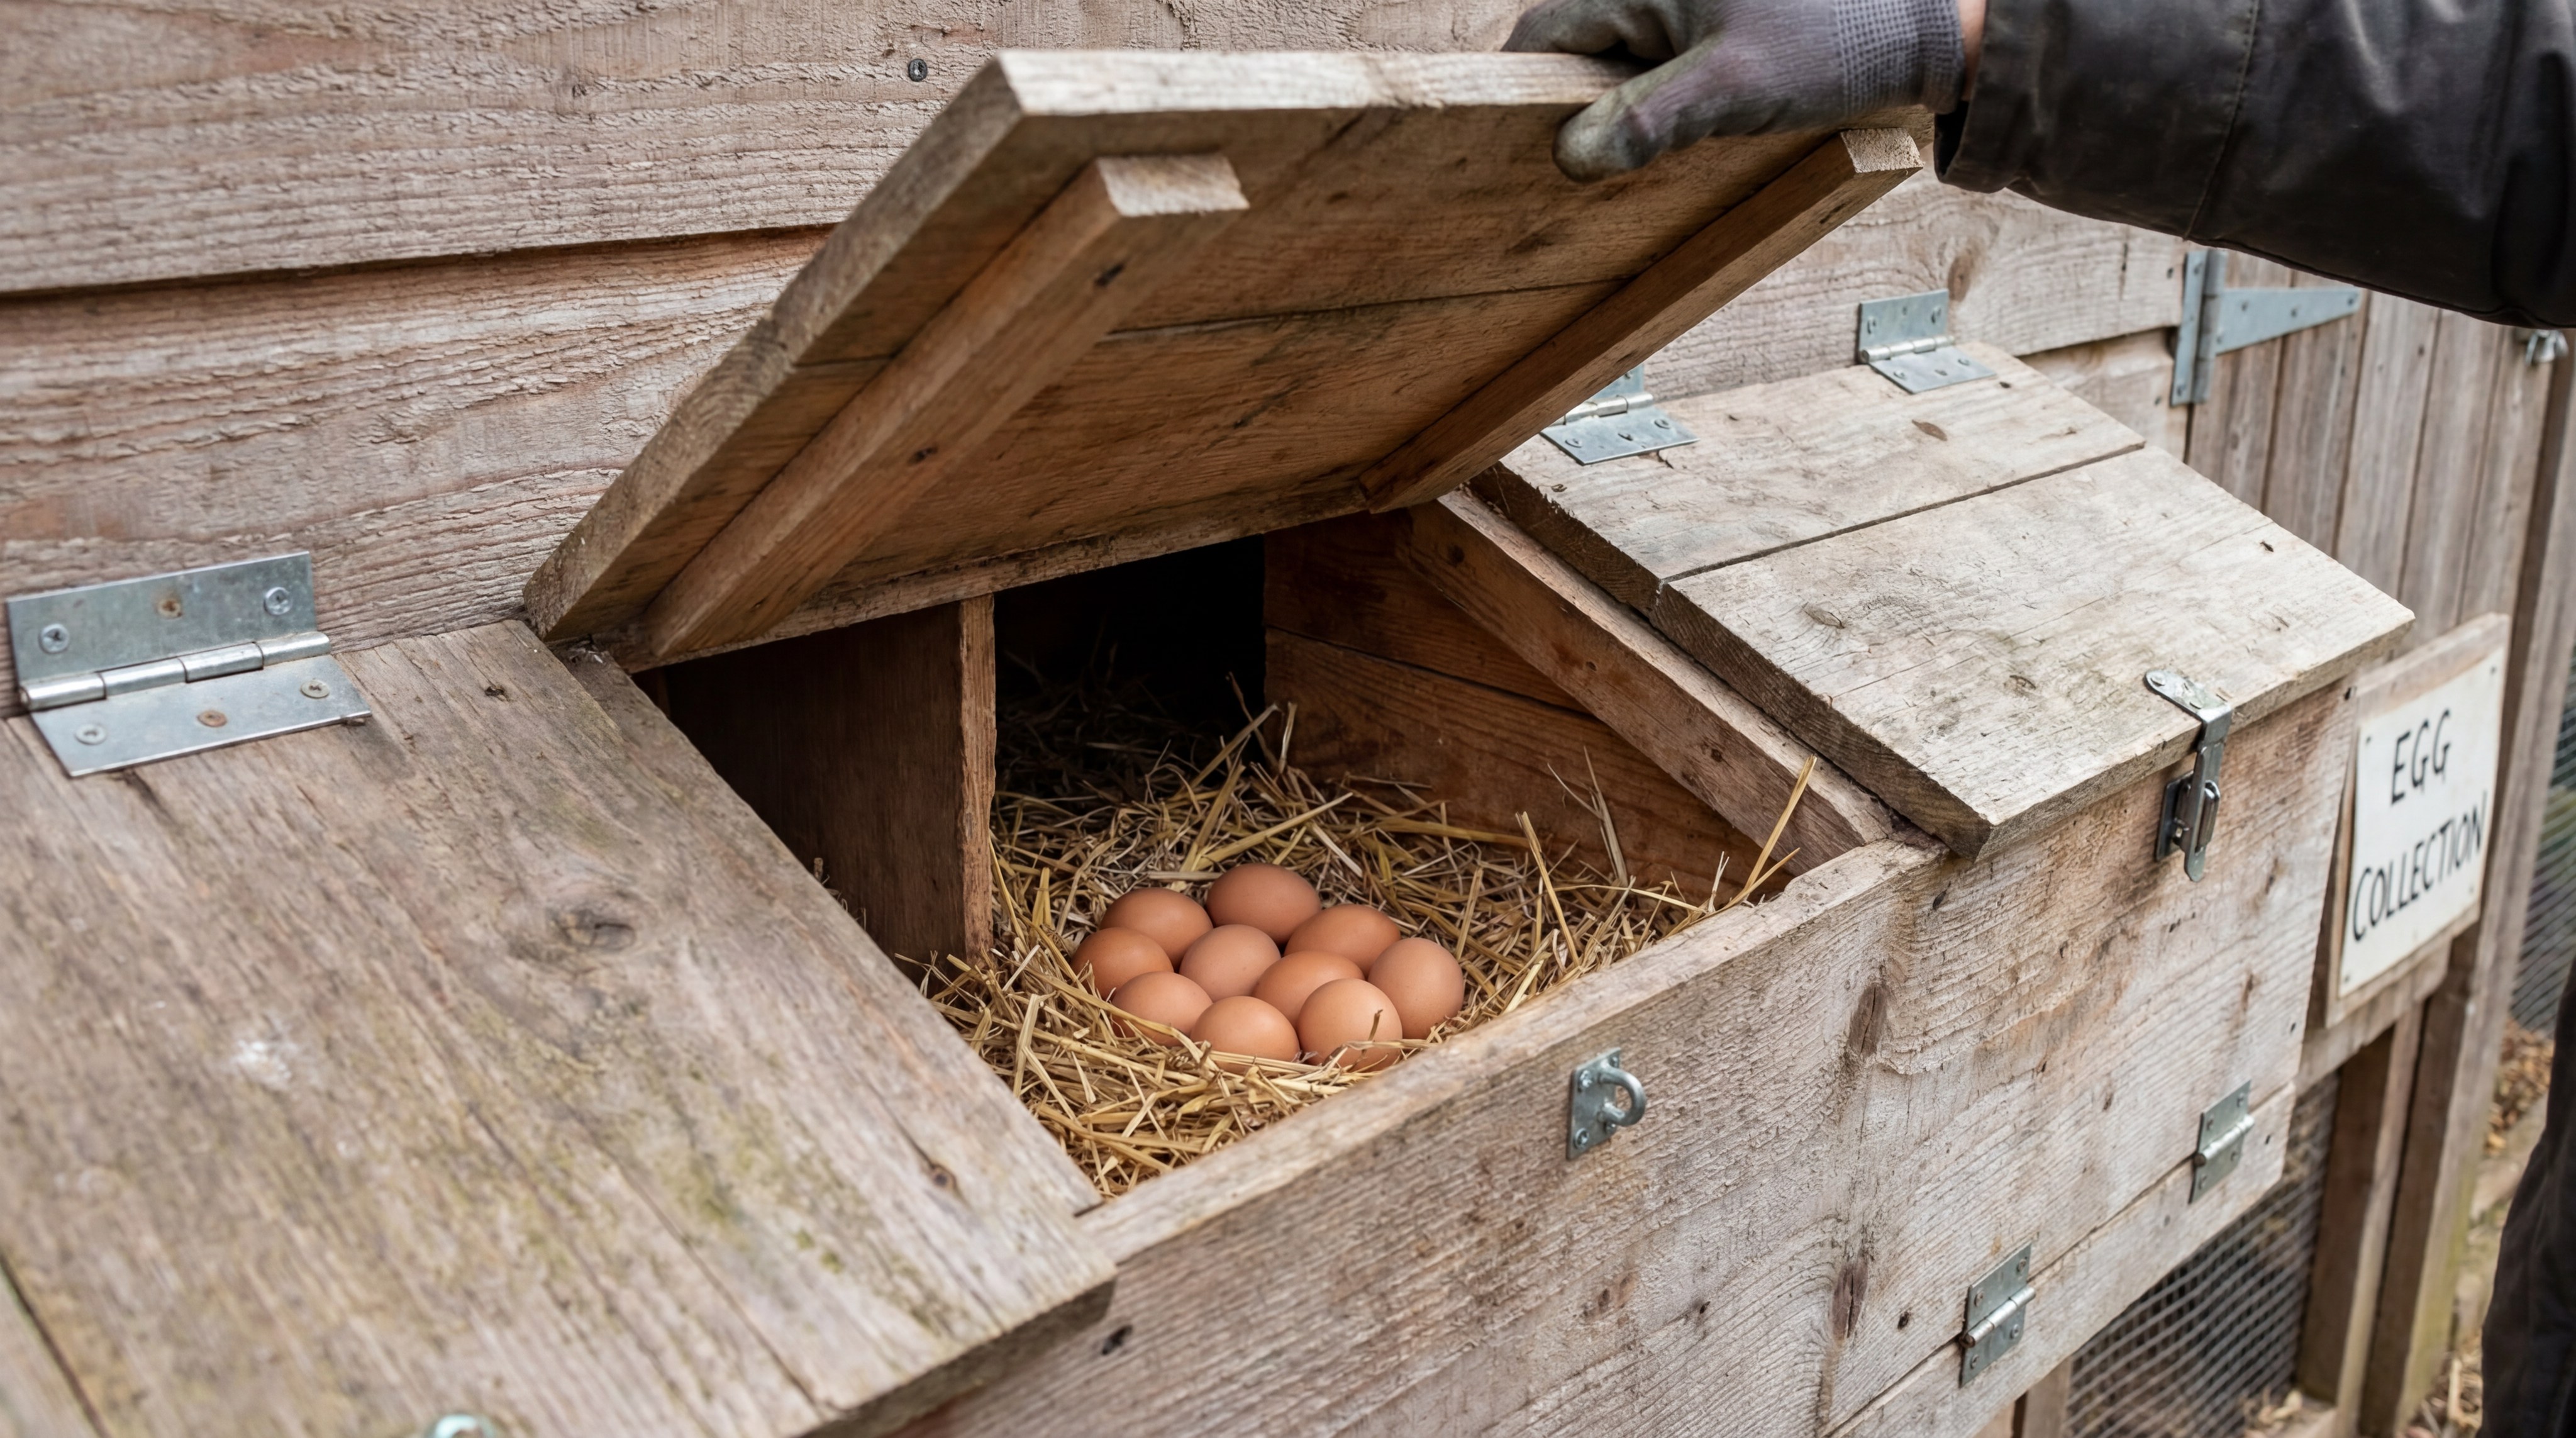
An efficient nesting box system utilizes a modular design with external access to allow for egg collection without entering the main house. When you plan how to build a chicken house, external access is a “quality of life” feature that saves hours of labor over the year.
It gets better: By keeping your boots outside the coop during collection, you significantly reduce the risk of tracking in bacteria.
Designing the Box Compartments
Individual compartments should measure approximately 12×12 inches, providing a secluded and secure space for hens to lay eggs. This size is ideal for most standard breeds and prevents multiple hens from crowding into a single box.
- Slope the roof of the nesting boxes to prevent birds from roosting on top of them.
- Use a 4-inch lip at the front of the box to keep nesting material and eggs inside.
- Ensure dividers are removable for deep cleaning.
Integrating External Access Lids
Equipping the nesting box with a hinged, weather-sealed lid allows operators to harvest eggs efficiently. This minimizes disturbance to the rest of the flock and keeps the birds calm.
Key Takeaway: External access to nesting boxes significantly improves daily operational efficiency and bio-security.
| Component | Dimension | Function | |
|---|---|---|---|
| Nest Size | 12″ x 12″ x 12″ | Laying Comfort | |
| Access Lid | Hinged Plywood | Collection Efficiency | |
| Dividers | 7/16″ Plywood | Privacy |
Modular nesting boxes allow for easy replacement or expansion as your flock size increases over time.
How should you design the entry and chicken doors?
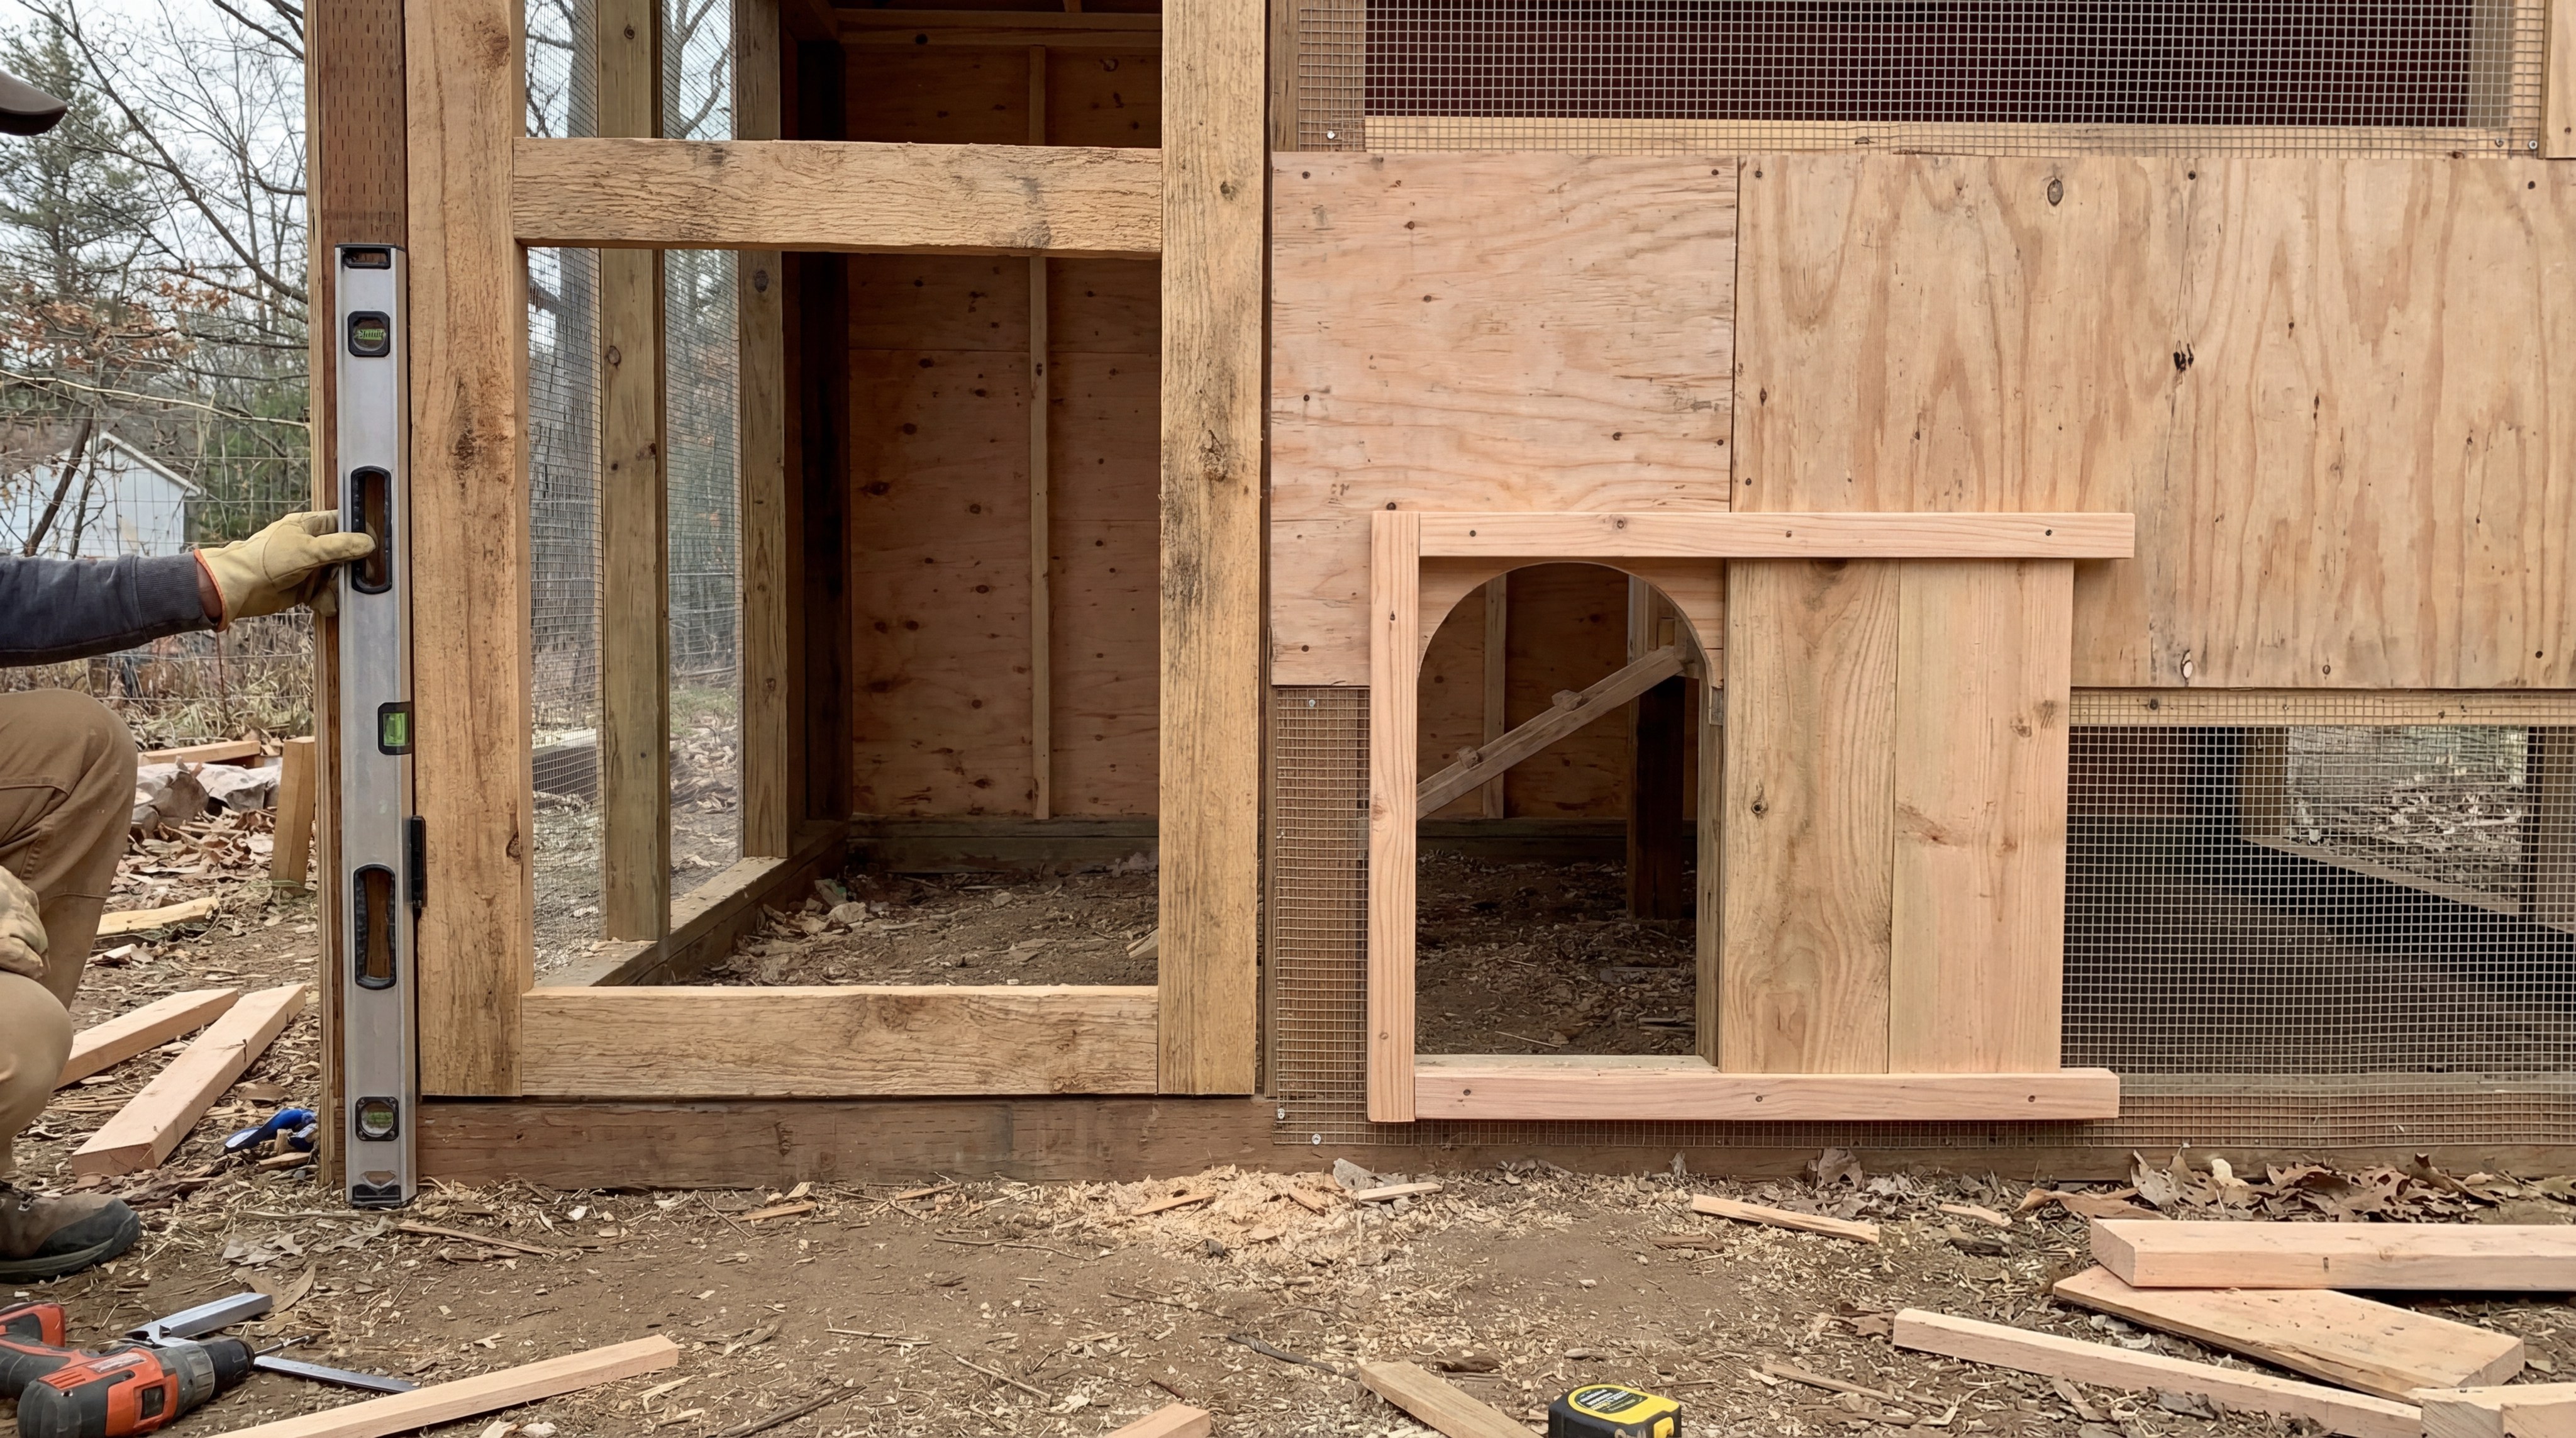
Entry doors must be sized for human access, while specialized chicken doors should include secure latching mechanisms and arched openings. Understanding how to build a chicken house means recognizing that a door is the weakest point for both predators and drafts.
You might be wondering: How do I balance the need for easy access with the requirement for absolute security at night?
Framing the Main Service Door
Constructing the door frame with 2×4 lumber and pocket hole joinery provides the necessary durability for frequent daily use. A heavy-duty door that doesn’t sag is essential for a building that you will visit at least twice a day.
- Use three hinges for the main service door to distribute weight.
- Install a heavy-duty latch that can be operated from both sides.
- Add a weather-strip seal to prevent cold air from entering during winter.
Building the Arched Poultry Entrance
An arched opening for the birds adds a professional finish and can be easily cut using a jigsaw before the sheathing is applied. This smaller door should be equipped with a sliding track or a heavy-duty hinge for night-time closure.
Key Takeaway: High-quality hardware and reinforced frames are critical for the security of both human and animal access points.
| Door Type | Purpose | Hardware Needed | |
|---|---|---|---|
| Service Door | Human Access | Heavy Duty Hinges | |
| Pop Door | Bird Exit/Entry | Slide Latch | |
| Window | Ventilation | Locking Hook |
Secure doors ensure that your agricultural investment remains safe from environmental threats and local wildlife.
How do you install a durable roof?
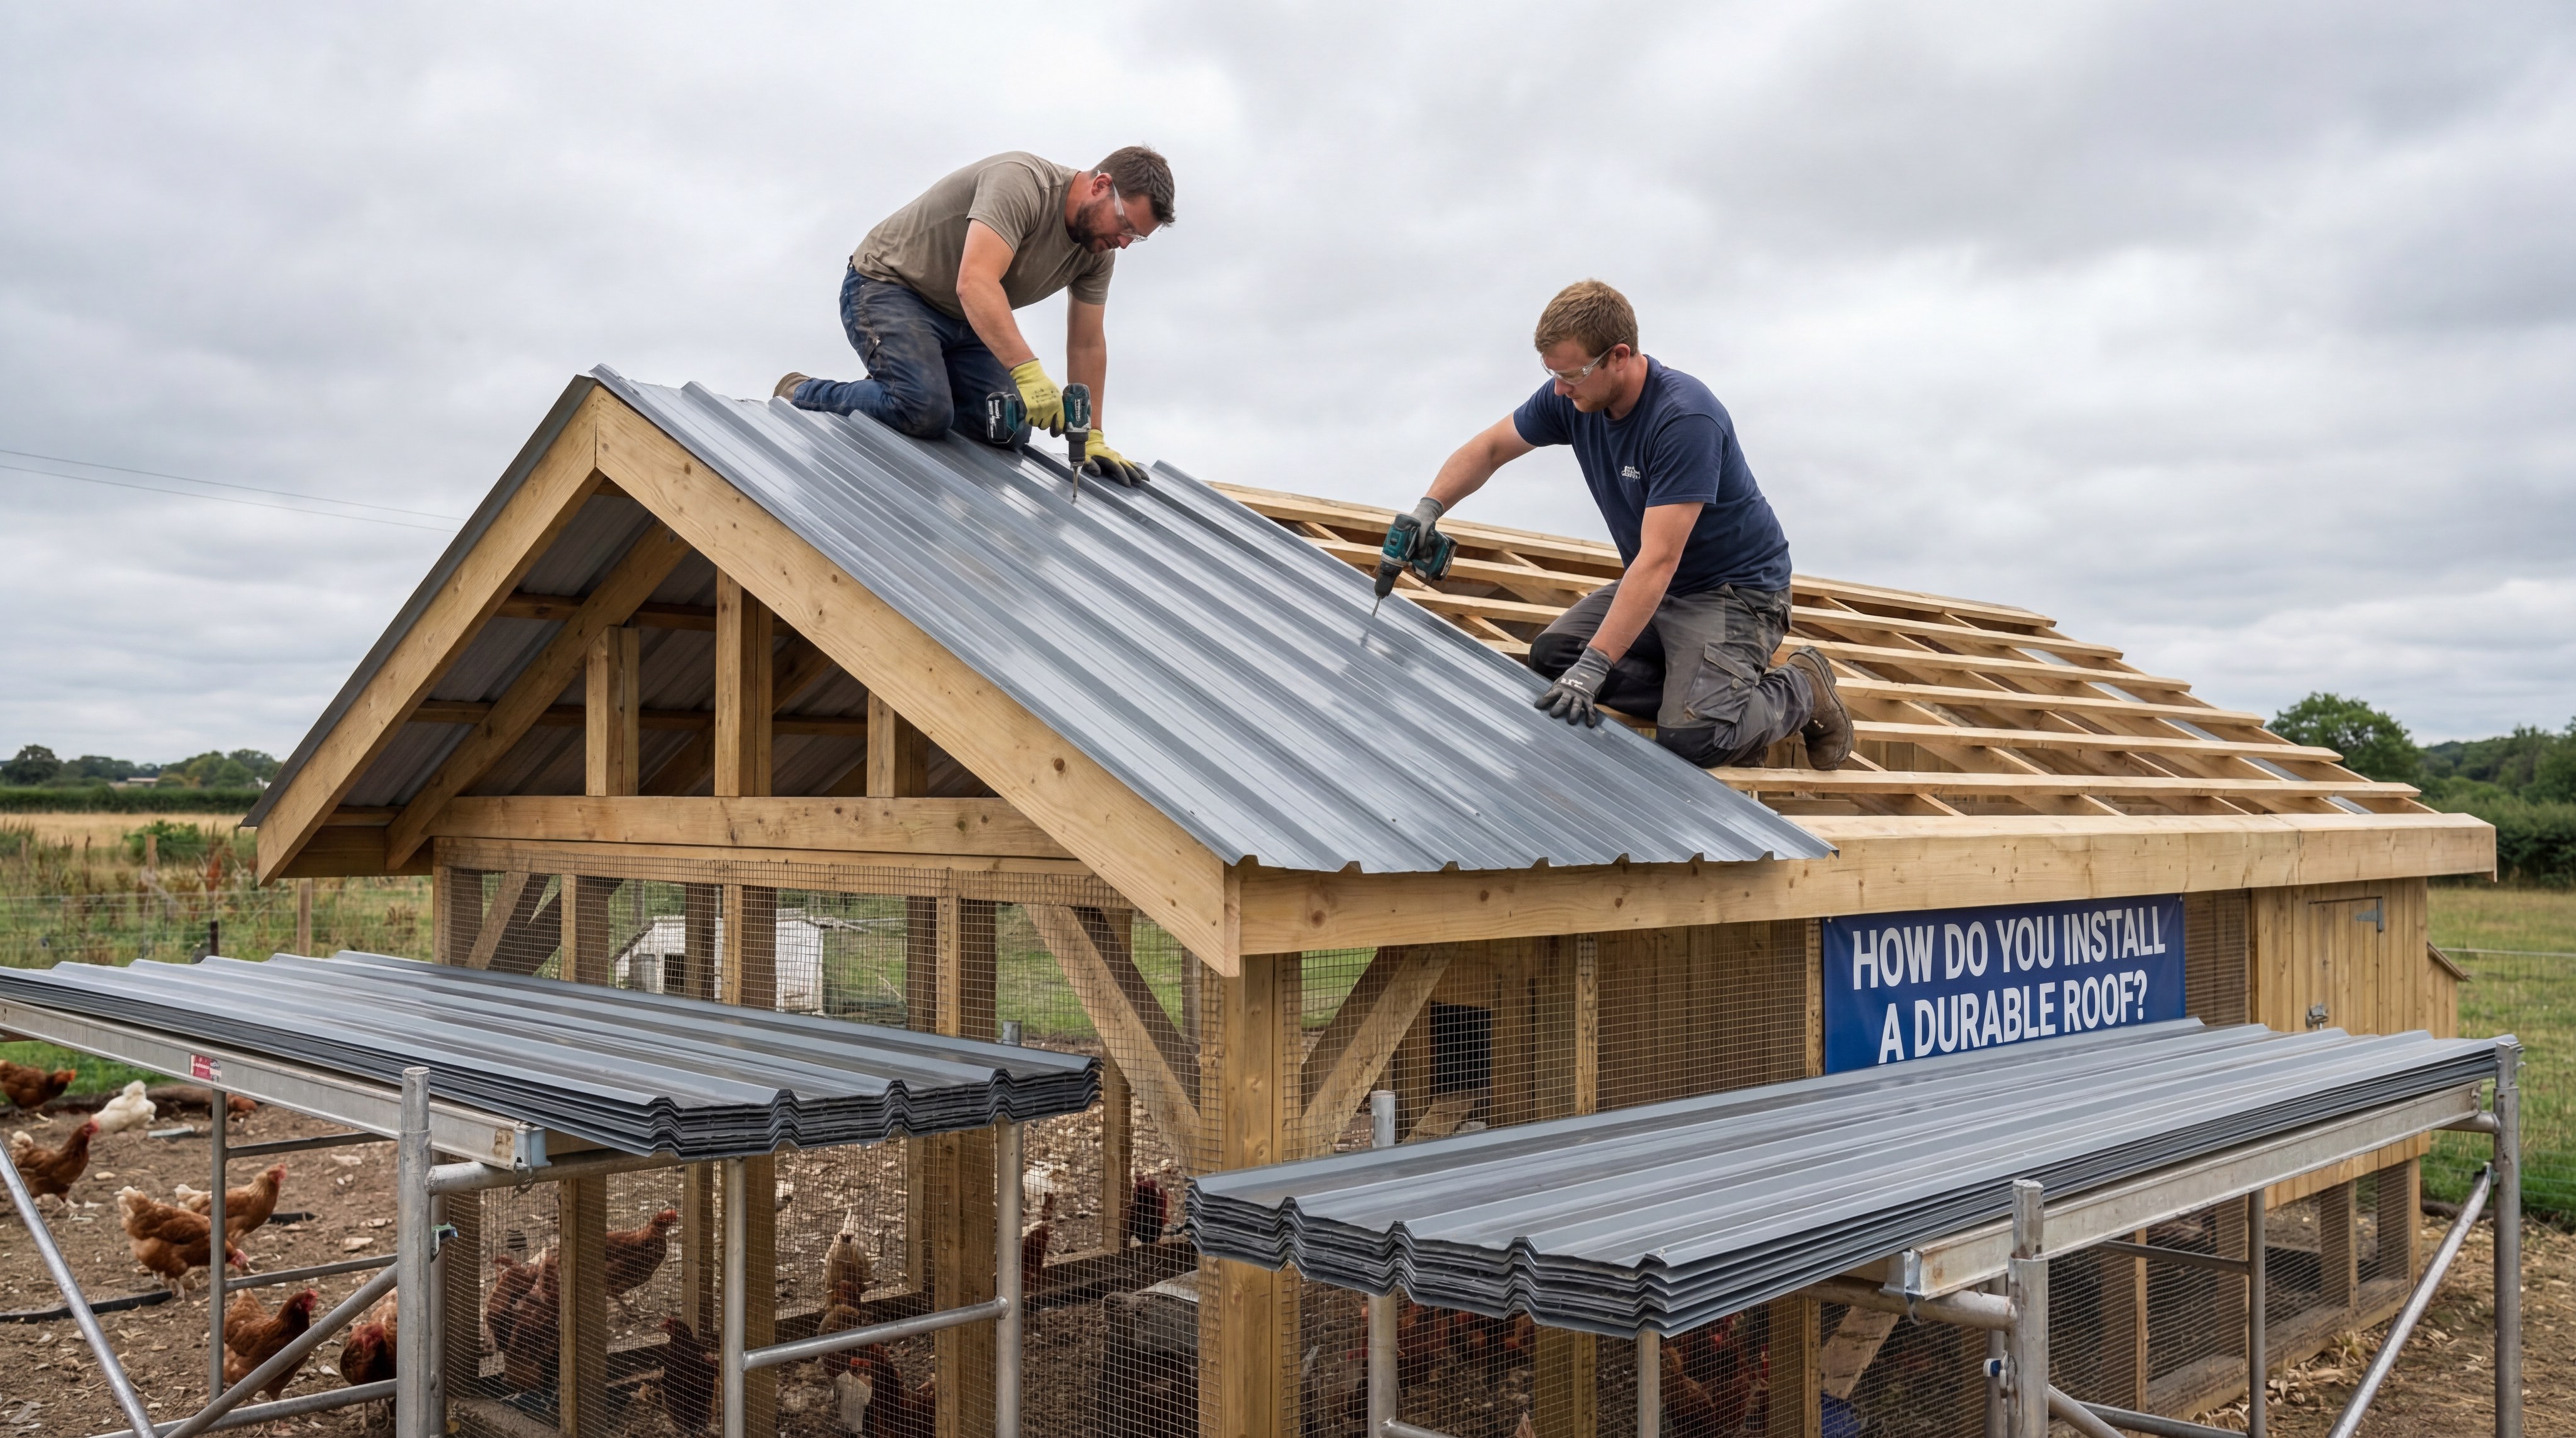
The roofing process involves fabricating panelized sections on the ground, sheathing them, and applying waterproof layers before mounting them to the main structure. Even in how to build a chicken house guides, the importance of a drip edge is often underestimated.
But wait, there’s more: Using corrugated metal or high-grade shingles can extend the life of your roof by decades compared to cheap felt options.
Fabricating the Rafter Panels
Building the roof in two main panels using 2×4 rafters allows for safer application of underlayment at ground level. This technique is faster and results in much straighter roof lines.
- Cut birds-mouth joints into the rafters for a secure fit on the wall plates.
- Use a ridge board to align the two roof halves perfectly.
- Install hurricane ties for extra security in high-wind areas.
Applying Weatherproof Layers
Drip edges and underlayment must be installed before the final roofing surface to provide multiple layers of protection. This prevents water from wicking back into the wooden fascia and causing rot.
Key Takeaway: Ground-level roof fabrication improves alignment and reduces the risk of falls during construction.
| Roofing Layer | Material | Function | |
|---|---|---|---|
| Underlayment | Felt Paper | Moisture Barrier | |
| Edge Protection | Metal Drip Edge | Water Diversion | |
| Surface | Corrugated Metal | Weather Resistance |
A professional-grade roof ensures that the interior remains dry, which is vital for preventing respiratory issues in your poultry.
How do you secure the outdoor poultry run area?
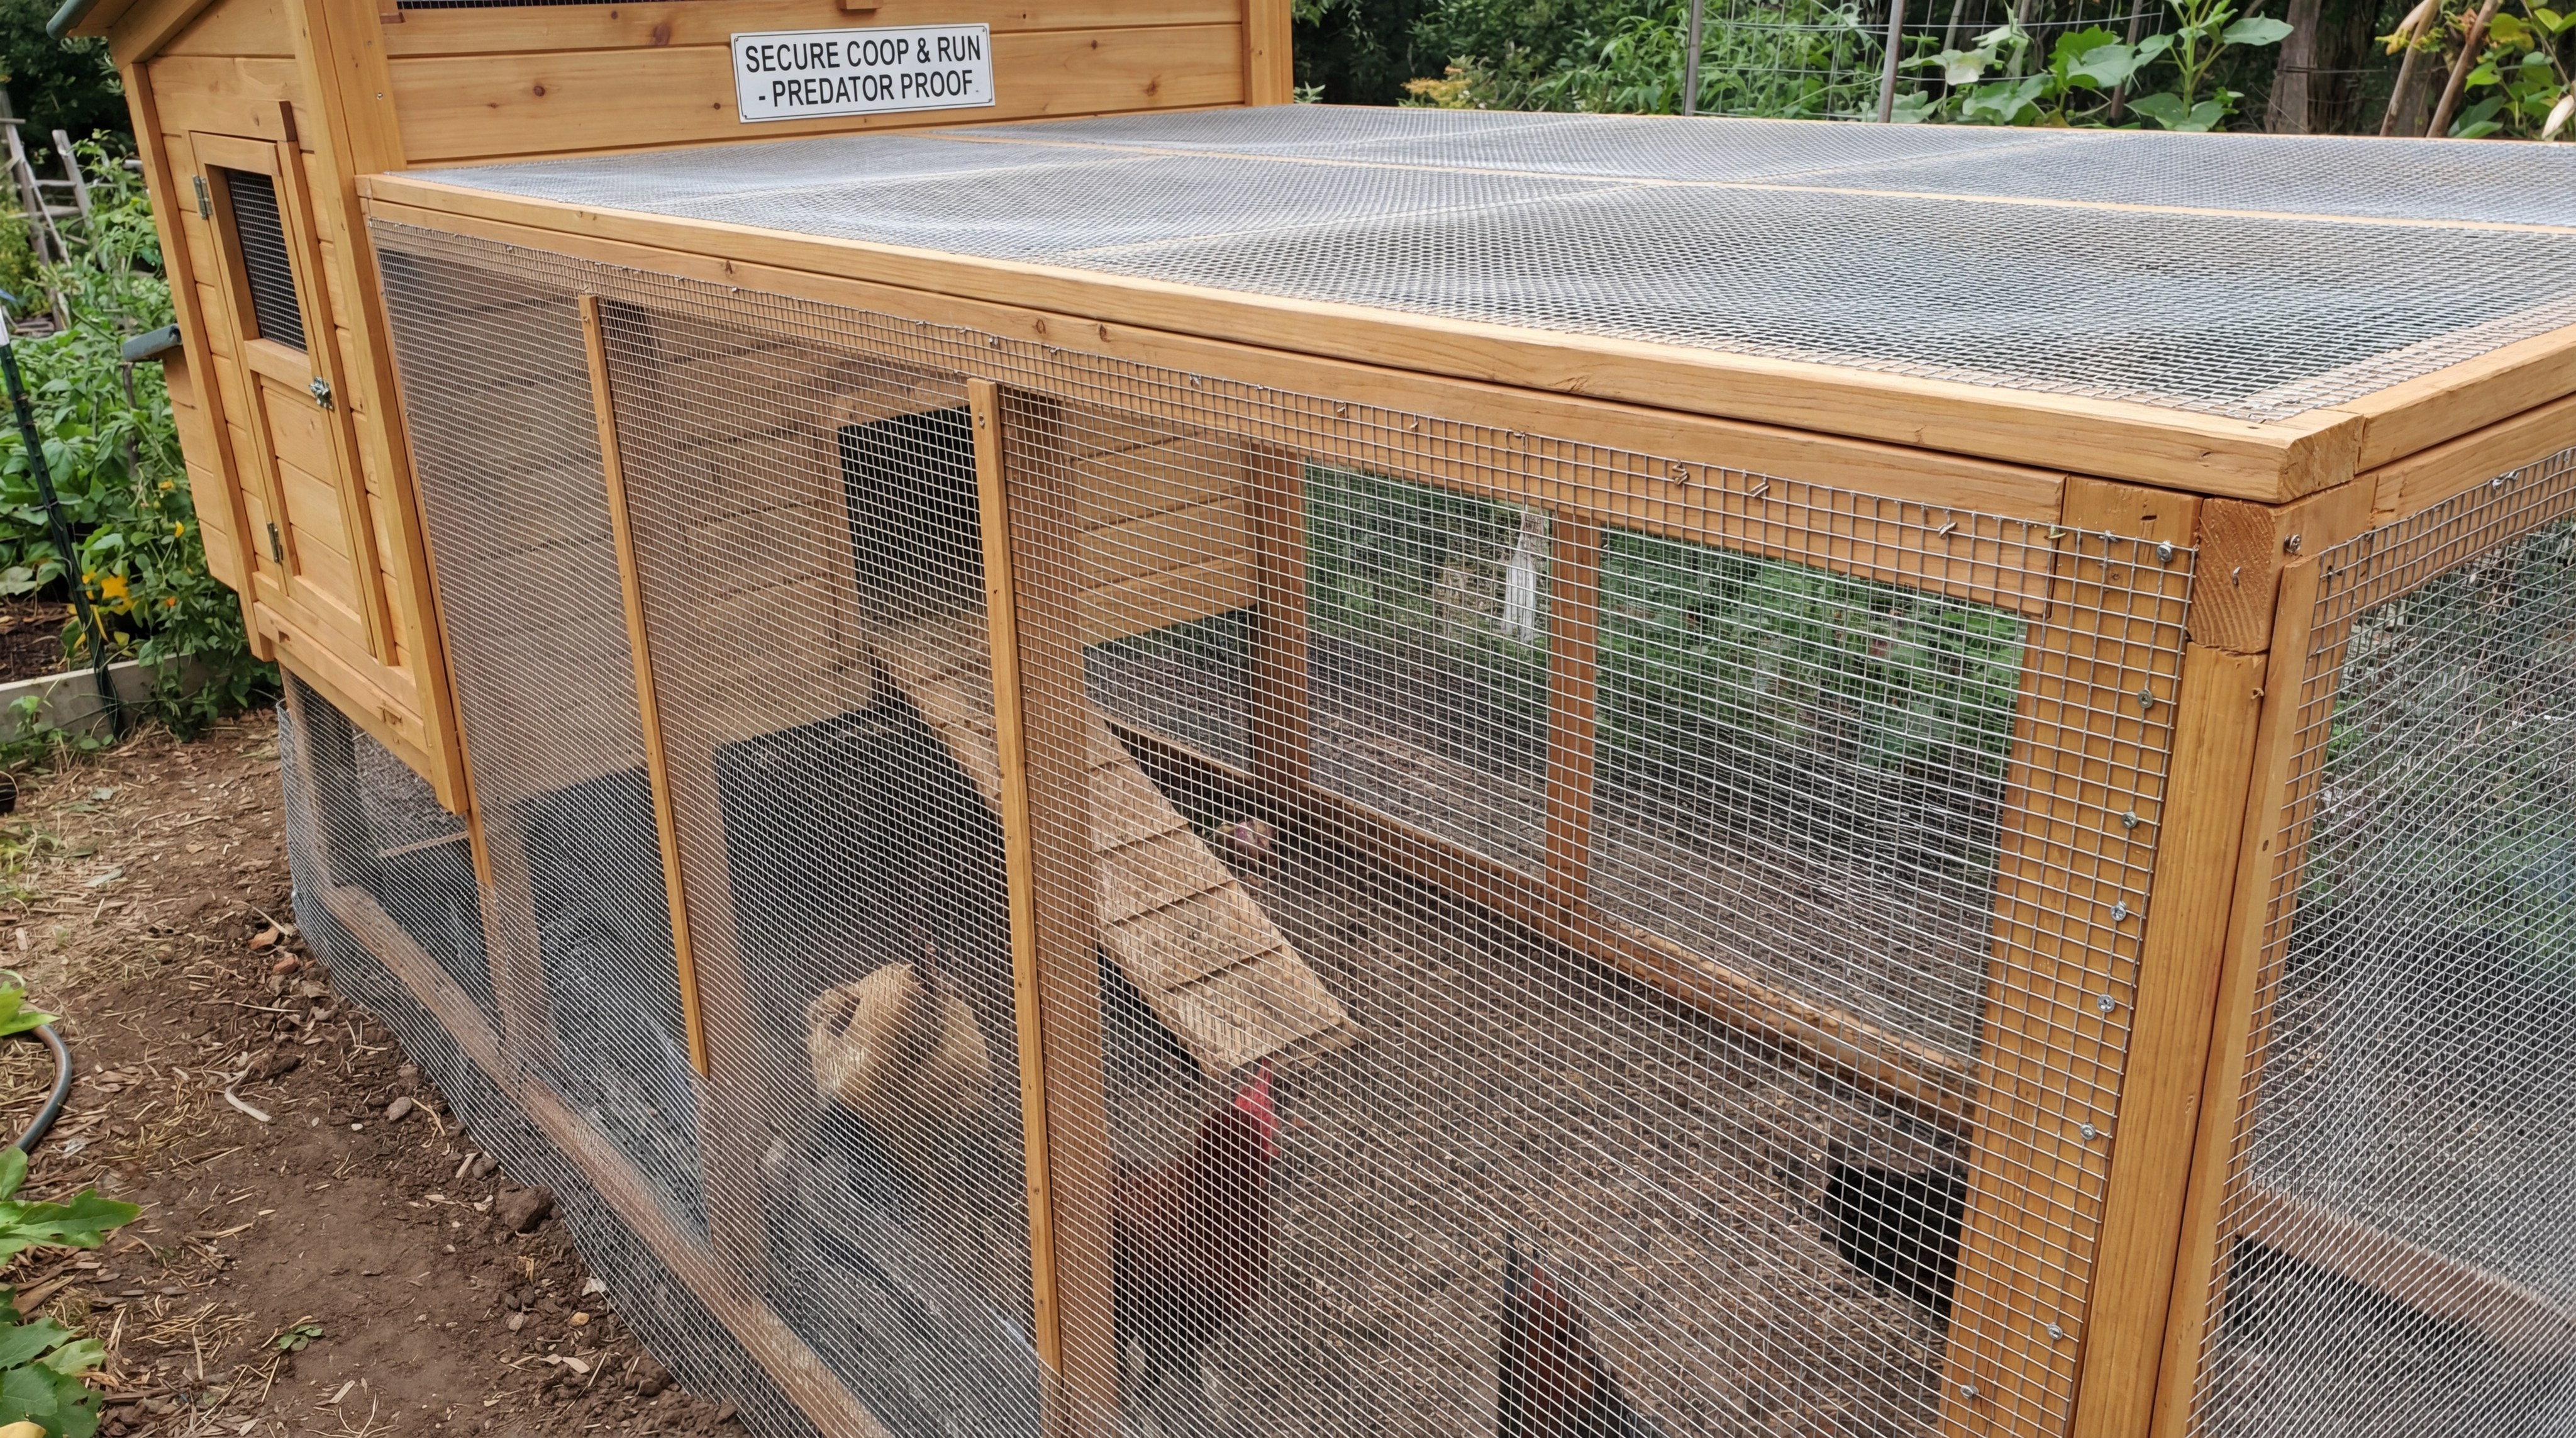
Securing the run area requires a robust timber frame covered in small-gauge hardware cloth to prevent entry by predators and pests. When learning how to build a chicken house , you must treat the outdoor space as a direct extension of the secure interior.
The best part? A secure run allows your birds to exercise and forage safely even when you aren’t there to supervise them.
Framing the Enclosure
A 2×4 pressure-treated frame serves as the skeleton for the outdoor run, extending from the main house. This frame must be anchored to the ground using stakes or concrete footers to prevent tipping.
- Space vertical supports every 4 feet for mesh stability.
- Add diagonal bracing to the corners to prevent the run from “racking.”
- Include a human-sized gate for easy cleaning of the outdoor area.
Installing Predator-Proof Mesh
Hardware cloth with a 1/2-inch or smaller opening should be stapled to the exterior of the frame. Unlike chicken wire, hardware cloth cannot be torn by larger animals or squeezed through by small rodents.
Key Takeaway: A secure outdoor run is just as important as the house itself for protecting your agricultural investment.
| Run Component | Specification | Benefit | |
|---|---|---|---|
| Frame | 2×4 Treated | Long-term Durability | |
| Mesh | 1/2″ Hardware Cloth | Predator Prevention | |
| Fasteners | Exterior Screws | Structural Integrity |
A fully enclosed and reinforced run provides peace of mind that your flock is protected from both ground and aerial threats.
How do you maintain a commercial-grade chicken house?
Maintaining a professional facility involves regular structural inspections, seasonal deep cleaning, and immediate repair of any material wear. In the context of how to build a chicken house, the construction phase is only the beginning of the building’s lifecycle.
Look no further: Proactive maintenance is the only way to ensure that your initial construction investment pays off over the long term.
Implementing an Inspection Schedule
Conducting monthly checks of hinges, latches, and roof integrity ensures that minor issues do not escalate into failures. You can learn more about us and our commitment to long-term building durability through our engineering resources.
- Check all mesh for holes or loose staples monthly.
- Lubricate door hinges and latches seasonally.
- Inspect the roof for loose shingles or metal panels after major storms.
Maintaining Sanitization Standards
The interior should be designed for easy wash-down, with all surfaces treated to resist moisture. Regular cleaning prevents the buildup of ammonia, which can be harmful to both birds and the structure itself.
Key Takeaway: Proactive maintenance and professional design support extend the life of your building and optimize flock productivity.
| Task | Frequency | Focus Area | |
|---|---|---|---|
| Latch Check | Weekly | Security | |
| Deep Clean | Quarterly | Sanitation | |
| Structural Audit | Annually | Integrity |
By following these maintenance protocols, you ensure a safe and productive environment for your poultry for many years to come.
For more information on industrial and agricultural steel structures, or to discuss your specific project needs, feel free to contact us for expert guidance. Our vision is to provide high-quality, durable building solutions that empower agricultural operations worldwide.
Professional Building FAQ
Can I scale these plans for a much larger flock?Yes, though larger structures may require heavier gauge materials or specialized steel frames to maintain structural integrity across longer spans. While wood is excellent for smaller setups, commercial-scale operations often transition to steel for durability.
What’s the best way to prevent predators from digging under the house?The most effective method is to install a “predator apron,” which involves burying hardware cloth 12 inches deep around the entire perimeter. This prevents animals like foxes or dogs from successfully digging their way into the enclosure.
How much ventilation is required for a professional chicken house?Ideally, you should have at least 1 square foot of ventilation for every 10 square feet of floor space. These vents should be positioned high on the walls to allow warm, moist air to escape without creating a direct draft on the birds.
Why should I choose pressure-treated lumber for the foundation?Pressure-treated lumber is chemically enhanced to resist rot, fungal decay, and wood-boring insects. In the high-moisture environment of a chicken coop, standard lumber would fail within a few years.
Is a steel structure better than a wood frame for large-scale operations?For commercial-scale projects, steel structures offer superior durability, fire resistance, and faster assembly times. Steel does not warp or rot, making it a lower-maintenance choice for large agricultural investments.